The Bortle Scale Explained: What Classes 1 Through 9 Really Mean
When searching for dark-sky sites, you run into the Bortle Scale, SQM, and NELM pretty quickly. The trouble is, the numbers alone don't paint a clear picture of how dark a sky truly is. This guide is for beginners planning their first stargazing trip and for anyone who's stared at a Light pollution map and still couldn't decide where to go. The goal: making sense of how night-sky darkness is measured and communicated.
The Bortle Scale rates sky darkness on a simple 1-to-9 system, where lower numbers mean darker skies. That said, what you actually experience on-site shifts with the moon phase, weather, atmospheric transparency, and nearby light sources like streetlamps or parking lot fixtures.
Here's what we'll cover: the visible differences across all nine classes based on real-world experience, how NELM, SQM, and Light pollution maps work together, and a practical approach to choosing an observation site that won't leave you disappointed. The aim isn't to take any single number at face value, but to help you judge for yourself whether tonight is genuinely worth heading out for.
What Is the Bortle Scale? A Quick Overview of the Nine Classes
Origin and Purpose
The Bortle Scale measures night-sky darkness in nine classes, from 1 to 9. It was devised by American amateur astronomer John E. Bortle and published in Sky & Telescope magazine in 2001. The numbering might feel counterintuitive: 1 represents the darkest possible sky, and 9 represents the brightest. Class 1 is a near-pristine dark sky with minimal artificial light, while Class 9 is a city center where the entire sky glows.
What makes this scale so widely used is that it describes darkness through the lens of what an observer actually sees. Whether the Milky Way appears as a structured band, how many stars become visible, or whether faint nebulae and galaxies are within reach -- these distinctions are easy to communicate without dragging in technical measurements. For someone just starting out, hearing "around Bortle 4, the Milky Way is visible but lacking fine detail" paints a more useful picture than an SQM reading ever could.
A key concept underlying the whole scale is Light pollution: the phenomenon where artificial light from streetlamps, signage, and building illumination spills into or over-illuminates the night sky. Japan's Ministry of the Environment and the National Astronomical Observatory of Japan both note its impact not only on astronomical observation but on the broader environment. Think of the Bortle Scale as a tool for gauging how much Light pollution has altered what you can see overhead -- framed in terms that match how it feels on the ground.
The Nine Classes at a Glance
You don't need to memorize all nine at once. Start with the broad strokes: Classes 1-3 are genuinely dark skies, 4-5 cover the practical darkness found in rural and suburban-rural areas, and 6-9 range from suburban to fully urban brightness. Even this rough grouping significantly sharpens your site-selection decisions.
Under Classes 1-3, the Milky Way commands attention. At a truly dark site, it stops being a simple whitish band and reveals its denser and thinner regions, its dark rifts threading through the glow. On a transparent night at an elevated observing spot, the Milky Way can appear almost printed onto the sky, rising with startling depth. The sheer number of stars visible to the naked eye jumps dramatically, and even a pair of binoculars opens up a much richer view of nebulae and star clusters.
Classes 4-5 represent the sweet spot where most people can realistically get that "I went stargazing and it was worth it" feeling. These conditions are common along rural roads and suburban highlands. The Milky Way is detectable, but it lacks the richness and three-dimensional quality of Classes 2-3. In my experience, around Bortle 4 the Milky Way reads as a faint, cloud-like band that you can trace across the sky, though the fine contrast is muted. Still, for someone arriving from a city, the difference in star count is immediately obvious.
At Classes 6-9, the sky background itself brightens and the range of visible targets shrinks fast. The Milky Way is essentially gone, and naked-eye observing centers on bright stars and planets. At a suburban star party, the common complaint -- "I can see Orion but the stars around it are sparse" -- is a textbook description of this range. Faint nebulae and galaxies get buried by the bright background, and even telescopes or binoculars can't fully compensate when the sky itself isn't dark enough.
The Bortle Scale often comes up alongside NELM (Naked-Eye Limiting Magnitude). NELM refers to the faintest star you can see with the unaided eye under a given sky. In areas with minimal artificial light, values around Magnitude 6-7 are typical, though NELM and Bortle classes don't map to each other in a strict one-to-one way. It's most practical to treat both as tools for sharing what you're seeing, not as precise conversion tables.
When the Bortle Scale Is Most Useful
The biggest strength of the Bortle Scale is that it makes relative comparisons between sites straightforward. Saying "Site A is around Bortle 4, Site B is closer to Bortle 3" instantly communicates which one is better suited for the Milky Way or faint deep-sky objects. When planning a trip to a dark site, you can narrow candidates on a map and then translate the options into Bortle terms to make a faster call.
It's also effective for sharing conditions on-site. At a star party or with friends, phrases like "tonight feels Bortle 3, really good" or "the map says it's dark here, but the parking lot lights push it to Bortle 5" quickly convey the situation. The scale's real value is in putting words to differences in sky quality that raw numbers can't easily express.
On the other hand, this is not an official absolute measurement. The same location can feel different depending on atmospheric transparency and low-horizon urban glow, and a map that shows a dark zone doesn't account for a single streetlamp that ruins your dark adaptation. For more objective comparisons, using Light pollution maps to get the broad picture and supplementing with instrument-based readings like SQM is the realistic approach. The Bortle Scale works best as an excellent "common language" that gets you started.
What Changes From Bortle 1 to 9? A Class-by-Class Breakdown
Classes 1-3
This range is where the effort of traveling to a dark sky clearly pays off. During a new-moon period with good transparency and the Milky Way riding high, you don't just see a bright streak -- you can read the contrast between dense regions and gaps, with dark rifts carving through the band. The closer you get to Class 1, the more the Milky Way looks less like a bright stripe and more like a three-dimensional river laced with dark lanes. On my best nights at high-altitude observing spots, I've noticed that the sky stops feeling "black" and starts feeling like star density has been painted in layers across a dark canvas.
Urban light domes stay subdued. Rather than a directionless wash of brightness, you might notice a faint, low glow hugging a distant horizon, leaving the overhead sky solidly dark. This difference is significant: not only the anchor stars of constellations but the finer stars surrounding them seem to appear all at once. The naked-eye star count is obviously higher, and on nights when limiting Magnitude reaches the 6-7 range typical of low-Light pollution areas, familiar constellation outlines can actually become harder to pick out because the surrounding stars overwhelm them.
For beginners, Class 1 is the dream, but sites that qualify are rare. In practice, Class 3 stands out as the best realistic first goal. If the Milky Way is your primary target, this is where satisfaction takes a noticeable step up. A useful rule of thumb in Japan: ordinary countryside tends to land around Bortle 4, while well-known dark-sky sites at higher elevations reach Bortle 3. The places people call "famous stargazing spots" are famous precisely because this is where the sky starts to feel qualitatively different.
Classes 4-5
Classes 4-5 are accessible to most people and still deliver genuine stargazing enjoyment. The Milky Way is visible when conditions cooperate, but it doesn't have that deeply etched quality of Classes 1-3. Instead, you can trace it as a band, but the fine contrast weakens. At Class 4 in particular, the Milky Way can briefly look like a thin cloud before your dark-adapted eyes resolve it as a concentrated river of stars. By Class 5, it's there but tends to dissolve into the sky background.
Urban light domes become noticeable near the horizon. The direction facing a distant city shows a whitish brightening in the lower sky, and the overall blackness of the sky shallows slightly. Even so, darkness holds up reasonably well toward the zenith, and summer Milky Way viewing, bright star clusters, and seasonal constellations are all well within reach. The visible star count is clearly different from a city sky: you move from a sky where you can trace constellation lines to one where countless stars fill in around those lines.
As a realistic recommendation for beginners, Classes 3-4 hit the target. If you want to see the Milky Way properly for the first time, you don't need to chase the absolute darkest site -- this range delivers. In Japan, "ordinary countryside" tends to fall around Class 4, reachable just by driving a short distance from a town. This accessibility is what makes the Class 4-5 range so practical for building stargazing into a regular hobby.
💡 Tip
For beginners hoping to see the Milky Way, aim for a Class 3-4 site where the sky directly overhead is genuinely dark and the glow along the horizon stays low. Rather than chasing a specific number, pay attention to the blackness above you and the absence of light domes near the horizon -- that's what connects the number to what you actually see.
Classes 6-7
This is where the cast of characters in the sky starts to change. The Milky Way becomes difficult to spot, and even on good nights, confidently identifying it as a band grows uncommon. The sky background is bright enough that subtle contrasts get washed out, killing the Milky Way's definition. At suburban observing sessions, I've found that Orion and the Summer Triangle show up clearly, but the density of surrounding stars thins out and the sky loses its sense of depth.
Urban light domes become prominently visible. The sky near the horizon brightens in multiple directions, and depending on the location, a faint wash of brightness creeps all the way to the zenith. The naked-eye star count drops noticeably -- your first impression looking up tends to be "there aren't many stars." The finer background stars that appear naturally under dark skies vanish, leaving mainly first- and second-Magnitude stars and the bold skeleton of the major constellations.
The key is to shift what you're looking for. At Class 6 and above, focusing on the Moon, planets, bright star clusters, and double stars gives a much more consistent observing experience. Jupiter, Saturn, the Pleiades, and the Orion Nebula (M42) remain rewarding targets, while faint galaxies and extended nebulae become a tough ask.
Classes 8-9
At Classes 8-9, the night sky is closer to a bright urban backdrop with scattered stars on top. The Milky Way is essentially out of the picture, and the impression shifts from "searching for things to see" to "only the brightest stars remain." On many nights the entire sky takes on a grayish tone, and even after your eyes adapt, the background brightness is what you notice first.
Urban light is no longer a distant glow -- it defines the sky above you. Brightness lingers not just at the horizon but well up into the sky, and the number of naked-eye stars is quite limited. Some constellations hold their shape, but with peripheral stars missing, they look noticeably stripped-down compared to a star chart. This is the range where beginners most often say "there are fewer stars than I expected."
The natural approach here is to narrow your targets deliberately. The Moon, planets, bright stars, and conspicuous open clusters are the main attractions. Even with binoculars or a telescope, the bright-sky barrier remains significant. Conversely, judging a Bortle 8-9 sky by Milky Way or faint nebula standards sets up a large gap between expectation and reality. Think of urban skies not as "a sky where you can't see anything" but as "a sky made for bright objects," and the class-by-class differences become much easier to organize.
How NELM, SQM, and Light Pollution Maps Relate
What Is NELM?
When translating the Bortle Scale into something you can check at your observing site, the most intuitive companion is NELM (Naked-Eye Limiting Magnitude). This is simply the faintest star you can see without optical aid under a given sky. A higher NELM means you're picking up dimmer stars, so "the same constellation looks completely different in terms of star count" becomes a tangible experience.
At star parties, beginners often ask "how many Magnitudes should I be able to see for it to count as a dark sky?" -- and this is the metric that connects most directly to what they're feeling. In areas with minimal artificial light, reports commonly land around Magnitude 6-7, and on nights when the sky's blackness is solid, fine stars well beyond the constellation outlines multiply visibly. Conversely, near cities, bright stars stand out while the surrounding fainter ones drop away, pulling NELM down.
If the Bortle Scale is a "holistic impression of visibility," NELM zeroes in on the faintest stars your naked eye can reach. Paired with a star chart app or an observing log, it helps you reconstruct how much sky quality you actually had on a given night.
What Is SQM?
The other metric you'll encounter frequently when evaluating sites is SQM (Sky Quality Meter). SQM expresses the brightness of the sky background in mag/arcsec² and is designed to be measured with an instrument. Where Bortle and NELM lean on human perception, SQM's job is to quantify the background brightness of the sky itself.
The part that trips people up is the direction of the numbers: a higher SQM value means a darker sky. It feels backwards at first, but that's consistent with how the astronomical Magnitude system works. A natural dark sky measures around 22.0-22.1 mag/arcsec² as a rough benchmark. When you're actually at a site that dark, the sensation is less "the sky is black" and more "the background has dropped away and stellar contrast has sharpened." The reason the Milky Way's band and dark rifts become easier to see around Bortle 2-3 is precisely this background darkness at work.
Because SQM gives a number you can compare directly, it's well-suited for logging site conditions. The downside for beginners is that values like 18 or 20 don't conjure up a mental image of what the sky looks like. In practice, use Bortle to form a rough impression first and reach for SQM when you need precision.
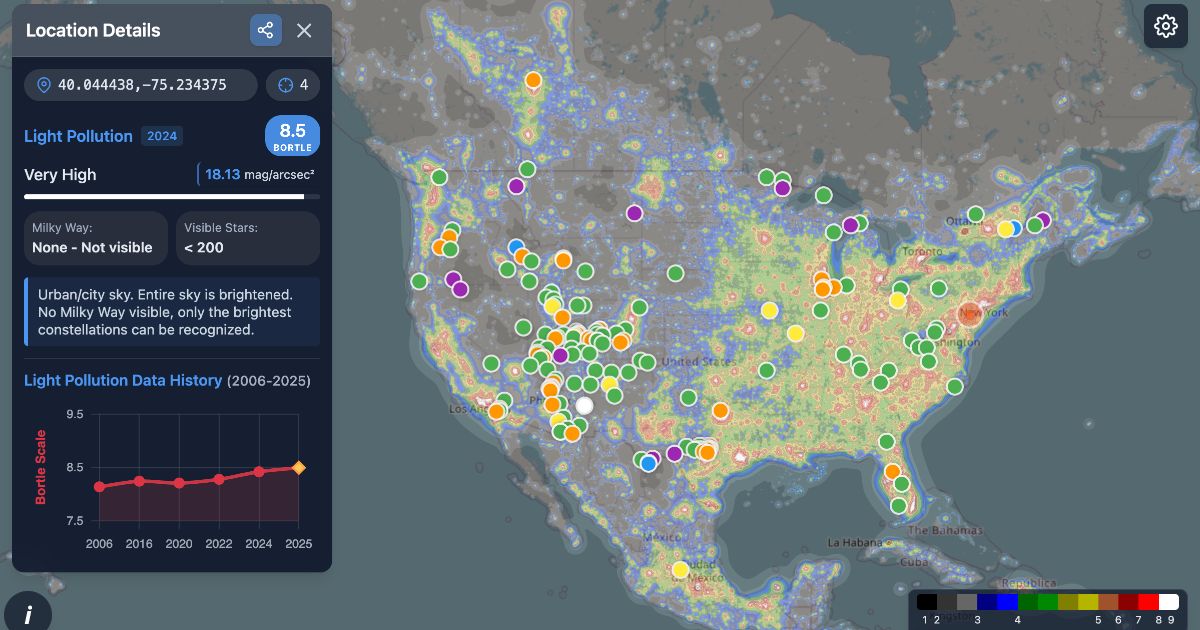
Light pollution maps share the same underlying philosophy as SQM. Tools like lightpollutionmap.app use color-coded overlays to help you spot dark areas across a wide region, and they're invaluable for planning observing trips. Some display Bortle class estimates or SQM approximations alongside the map, making it easier to compare things like "which mountain range along the prefectural border is a step darker" or "is the coast or the interior blacker." I always start trip planning by narrowing candidates on the map, though I've learned that a spot that looks dark on-screen can still have parking lot lights or low-horizon urban glow that the map doesn't capture. The final impression always depends on terrain and nearby light sources.
光害マップ|ボートルスケールで見る星空の暗さ (2026)
2026年版の最新光害マップ。世界中の空の暗さをボートルスケールやSQMでリアルタイムにチェックし、日本を含む天の川やオーロラ観察に最適なスポットを見つけましょう。
lightpollutionmap.appCross-Referencing: Rough Conversions and Caveats
Bortle, NELM, and SQM are related, but they are not in strict one-to-one correspondence. Keeping this distinction clear saves a lot of confusion when reading the numbers. Bortle is a holistic visual assessment, NELM measures the faintest star your eye can reach, and SQM quantifies background sky brightness. Each looks at something slightly different, so treating them as interchangeable introduces errors.
For practical purposes, rough benchmarks work well enough. Under a dark natural sky, SQM hovers near the natural-sky baseline of around 22.0, and NELM falls in the Magnitude 6-7 range. In suburban skies, SQM drops, NELM drops with it, and the Milky Way's appearance weakens by a noticeable step. The on-the-ground feel is that around Bortle 4, "the band is traceable but fine detail is weak," and as brightness increases further, "confidently confirming the Milky Way at all becomes less common."
ℹ️ Note
A useful reading order: start with Bortle for the big picture, add NELM to calibrate what your eyes are actually seeing, and bring in SQM if you need a background-brightness check. That sequence gives you a complete overview.
A comparative reference from Japan's Ministry of the Environment treats these metrics as complementary, meant to be used side by side. Including Light pollution maps, the practical formula is: maps for finding candidate sites, Bortle for setting on-site expectations, NELM and SQM for logging your observations. Cross-converting numbers is handy, but treat the results as "at roughly this level of darkness, visibility tends to look like this" -- guidelines, not gospel.
Reading Light Pollution Maps and Choosing an Observation Site
How to Use the Tools
For finding an observing site, the most efficient workflow is to survey a broad area first and then drill down to on-the-ground conditions. Two tools stand out: lightpollutionmap.app for searching on a global scale, and the Japan Light Pollution Map for narrowing locations within Japan based on local geography. The former excels at wide-area searches, while the latter makes it easier to compare specific spots -- like finding which mountain pass along a prefectural border offers darker skies.
The color coding on these maps generally represents artificial sky brightness. Warmer colors indicate brighter areas; cooler and darker shades point you toward dark sites. That's enough to get started, but color alone will mislead you. Two spots with similar coloring may differ drastically: one might have a city peeking into the edge of your field of view, while the other has a ridgeline blocking that glow completely. I've compared two map-equivalent locations more than once only to find that one had a noticeably brighter low horizon at the actual site.
lightpollutionmap.app is a convenient tool that color-codes wide areas to help you identify dark zones. The specific overlays available (Bortle estimates, SQM approximations, etc.) can vary by version and settings, so keep in mind that Bortle or SQM estimates may or may not appear for a given location. The general rule of thumb: lower Bortle numbers mean darker skies, and higher SQM numbers mean darker skies.
The Japan Light Pollution Map overlays well with domestic roads and mountain topography, which makes it practical for avoiding "dark on the map but inaccessible in reality" situations. A spot that looks ideal might sit at the end of a forest road closed at night or border private land -- cut those from your list early. Site selection isn't just about darkness; it needs to include whether you can actually stand there and look up.
Comparing Candidate Sites
Start by checking the Bortle or SQM estimate for your home area, then narrow to 2-3 candidate sites within driving range (our observing-spot articles may also be helpful -- for example, Shirabiso Highland or Utsukushigahara Highland, both in Japan's Nagano Prefecture). If you're based in a suburban area, even a short drive into the countryside makes a visible difference in star count, and heading into mountain terrain changes the Milky Way experience entirely.
When comparing, look beyond map darkness and also consider which directions the sky is open. If a target rises low in the south on a given night, a candidate with a city to the south is at a disadvantage. Conversely, a site where the city sits behind a mountain ridge can perform above its map numbers. Ridgelines act like natural light shields. On the ground, the difference between a site with a washed-out low horizon and one where the sky tightens cleanly all the way down is striking.
Fixing a comparison checklist eliminates indecision. Here are the four things worth checking:
- The Bortle/SQM gap between your home and the candidate
- Whether a city lies in the direction of what you want to observe
- Whether terrain or ridgelines cut off low-horizon light
- Road access and ease of arrival
Of these four, access is the one most often overlooked. A dark spot on the map means little if the mountain road gets you there past midnight, or if the last stretch is a narrow forest track with no room to pass. If the walk from parking to observing position is long, hauling gear becomes a real burden. Burning energy on logistics dulls your impression of the sky once you're there.
💡 Tip
When comparing sites, "the direction you want to observe is dark and you can park safely" will consistently beat "the map says this spot has the best numbers."
Same-day go/no-go decisions are best folded into your site-selection process. Check whether you're near new moon, then review satellite imagery and cloud-cover forecasts for the broad weather picture, and factor in transparency. I look beyond cloud cover alone -- whether the air is dry and whether upper-atmosphere turbulence is calm both matter. On humid nights, even in a low-Light pollution area, urban glow along the horizon spreads more than expected and the sky never tightens up. Dry nights at the same location, on the other hand, push the background down and sharpen stellar contrast noticeably. The go/no-go call is less about finding a dark place and more about judging whether tonight, that place will actually deliver the darkness it's capable of.
On-Site Checklist
Even a site that looked promising on the map can change your mind within a few minutes of walking around. When you arrive, check nearby artificial light sources before you look up. Streetlamps, parking lot lights, and vending machine glow in your field of view slow your dark adaptation. Parking areas are a common blind spot: the sky overhead may be dark, but periodic headlights from arriving and departing cars sweeping across your position tank observing comfort.
Run through these items in order to keep your assessment organized:
- Are streetlamps or parking lot lights shining directly into your eyes?
- Does the traffic flow overlap with your observing position?
- Is the direction of your target object blocked by mountains or trees?
- Is there adequate parking and room to pull aside?
- Is the ground safe to stand on for an extended period?
- Restroom availability
- Cell phone signal
Of these, lighting and traffic flow create the biggest swings in experience. I've arrived at sites where the sky was dark but something felt off, and the cause was almost always proximity to a vehicle path. Just a few headlight sweeps make it hard to track faint targets even through binoculars. Moving to a shadowed spot a short distance from the parking area can make the same site feel like an entirely different place.
Checking your sight lines on-site is equally important. If you're after the summer Milky Way or a target that transits low in the south, a high ridgeline to the south wastes the site's darkness. For circumpolar targets or meteor shower radiants, what matters is which direction offers the widest unobstructed view. The shift in thinking is subtle but powerful: rather than "find a dark place," aim to pick a spot where the sky is open toward tonight's target.
For safety, confirm that you're allowed to park there, that your car won't block passing traffic, and that you can leave quickly if you need to. Even well-known observing sites can be pitch-dark with hidden drop-offs and soft shoulders. Restrooms and cell signal are minor concerns that loom large during long sessions. If you choose a site on darkness alone, these practical details are what tend to trip you up. On-site, prioritize light, direction, parking, and safety in that order to keep things organized.
Limitations of the Bortle Scale, and Why Numbers Alone Aren't Enough
Subjectivity and Observer Variation
The Bortle Scale is convenient precisely because it lets you share a night-sky impression in a quick 1-9 rating. The flip side is that subjectivity is baked in. Bortle was always designed as an observer-assigned assessment of "what can I see and how well," so two people standing at the same site can arrive at different ratings.
The most common source of disagreement is dark adaptation. Someone who just arrived and someone who's been sitting in darkness for a while will see dramatically different star counts. At star parties, someone who's been checking their phone repeatedly tends to report "fewer stars than expected," while someone who gave their eyes time notices "the faint stars suddenly appeared." The Bortle Scale absorbs this perceptual gap directly.
Observing experience also matters. A seasoned observer who knows what to look for can pick up faint star patterns and Milky Way structure that a beginner, whose attention gravitates toward bright stars, would miss entirely. I've watched people assess the same sky on the same night and split between "the Milky Way is clearly visible" and "it just looks like a hazy cloud." Sky darkness is only part of the equation; what you know to look for shapes the rating too.
NELM shares the same issue. Its definition -- "the faintest star visible to the naked eye" -- is straightforward, but actual results depend on visual acuity and star-finding skill. Bortle is frequently used as a rough NELM proxy, but the conversion ranges vary across references for exactly this reason. Having a number doesn't automatically make it objective.
Weather, Moonlight, and Ground Conditions
Thin clouds are deceptive. The sky can look cloud-free to the naked eye while a high, thin layer scatters urban light and turns the entire sky milky. Coastal fog, spring dust haze, basin-level radiative-cooling mist, and valley inversions that trap city light in layers below mountain sites all affect conditions in ways a fixed Bortle rating can't predict. On nights when humidity or visibility degradation is a concern, it's worth reconsidering your observing plan.
Moonlight has an even larger impact. A dark-sky site loses much of its advantage simply because the moon is up -- faint Milky Way structure and dark rifts wash out noticeably, even at a low Bortle class. Snow-covered ground produces a similar effect from the other direction: reflected surface light brightens the surroundings and interferes with dark adaptation. On winter highland trips, I've had nights where the sky overhead was genuinely dark but the snow underfoot was surprisingly bright, reducing contrast through binoculars.
ℹ️ Note
A Bortle value reads more accurately as "the darkness this site can deliver when conditions cooperate" than as a permanent rating for the location.
When these factors stack up, a site that usually performs well can feel one or two classes brighter. The reverse is also true: a suburban site on a transparent, moonless night with local light sources blocked can exceed its on-paper numbers. Conditions matter at least as much as the address.
Criticisms and Complementary Metrics
The Bortle Scale was published in 2001 -- relatively recent, as these things go -- and its popularity comes down to a clear advantage: it's easy for beginners to understand. In research and precision-comparison contexts, however, its accuracy and utility have been questioned. Class assignment depends on observer judgment, and the mapping between classes and NELM or SQM values isn't clean. For rigorously ranking sites, relying on this scale alone leaves room for error.
SQM and Light pollution maps fill in those gaps. SQM measures background sky brightness in mag/arcsec², making direct comparison easier, with the natural dark sky sitting around 22.0 as a benchmark. Dedicated SQM meters are available commercially; recent listings in Japan have typically ranged around 20,000-30,000 yen (~$130-200 USD), though prices vary by model and seller. Checking current availability before purchasing is recommended. Light pollution maps excel at site discovery but can't capture on-site streetlamps or parking lot lights, so they work best when combined with ground-level judgment.
In the end, the Bortle Scale is excellent as a tool for putting your first impression of a site into words. For comparing trip destinations or planning astrophotography sessions, layering SQM, moon phase, and transparency data on top reduces the chance of disappointment. Long-exposure astrophotography is especially sensitive to slight sky brightness and low-horizon gradients that the naked eye might not even register.
In the modern era, factors beyond fixed urban lighting also deserve attention. Satellite constellations, for instance, have emerged as a new challenge for dark-sky preservation and are discussed internationally. As noted by the National Astronomical Observatory of Japan, the growing number of artificial satellites affects long-exposure imaging and observation planning. Even at sites with minimal ground-level Light pollution, the increasing number of moving light sources crossing the sky means "it's a dark location, so we're fine" no longer fully holds.
Taken together, the Bortle Scale is extremely useful as an entry point, but it is not the single definitive metric for sky quality. Getting a real handle on the quality of a night sky requires reading both subjective visual impressions and instrument-based measurements side by side.
Beginner's Guide: What to Observe at Each Bortle Level
Bortle 1-3: Savor the Sky Itself
In this range, the first thing to pursue isn't individual objects but the sheer amount of information the sky contains. Looking up with the naked eye, you don't just confirm the Milky Way's presence -- you can follow the wider and narrower sections of the band, the areas packed with stars, and the dark rifts that split through the glow like cracks. At a dark mountain site, the Milky Way's presence can grab your attention before you even think about identifying constellations. Beginners tend to focus on "what should I point a telescope at," but under these skies, spending time just looking up with nothing in your hands is the real luxury.
Faint emission nebulae and large galaxies become viable targets. That said, "visible" here doesn't mean the vivid colors of a photograph. Through the naked eye or binoculars, you're mostly perceiving subtle glows and expanses of faintly brightened sky. On the best nights, you might detect a region of sky that seems slightly luminous -- the signature of a diffuse nebula -- or sense the extended presence of a large galaxy. At Bortle 1-2, the joy leans toward reading structure in the Milky Way's band, while at Bortle 3 the fun of tracing that structure is still very much alive.
Wide-angle fixed-tripod photography pairs well with this darkness range, too. Mounting a camera on a tripod for a starscape shot reveals structure that looked faint to the naked eye with surprising clarity. The naked-eye view and the photographic result don't match, so it's best not to treat a captured image as "what I saw," but on-site satisfaction from combining both is genuinely high. If sky darkness is the star of the show, the approach for this range is to go looking for "Milky Way structure and contrast" rather than individual constellations.
Bortle 4-5: Binoculars Take Center Stage
From this range onward, the moment you raise binoculars, the sky opens up in a way that naked-eye viewing alone can't match. The Milky Way may be visible as a band on some nights, but the pleasure of reading its fine detail fades, and binoculars aimed at bright targets deliver more consistent satisfaction. At beginner-oriented star parties, handing someone a pair of binoculars at this class almost always gets an immediate reaction -- the sense that "the number of stars just multiplied" clicks fast in this zone.
Open clusters are the prime targets here. The Pleiades (M45), with its generous apparent size that fits neatly into a binocular field of view, is an ideal match. Wider scattered clusters that fill the eyepiece with sparkling points also work well.
The Andromeda Galaxy (M31) is another flagship target at this darkness level. Arriving from a city-sky perspective, people are often surprised that a galaxy is within reach at all. Through binoculars, you can sometimes make out the central core glow stretching into an elongated smear of light. It's not the spiral structure of photographs -- think of a subtle, extended luminous streak. Once you've experienced that, the value of making a trip to a Bortle 4-5 site becomes concrete.
Bright nebulae and globular clusters are also well within range of modest equipment. Use binoculars to locate the target and a small telescope to magnify it slightly, and you'll see concentrations and glows invisible to the naked eye. Bortle 4 carries the sense of "the sky itself still has something to offer," while Bortle 5 shifts to "pick the right targets and it stays engaging." Both are ranges where building your session around binoculars keeps disappointment at bay.
💡 Tip
Objects that look spectacular in photographs may appear as "a subtle spread of light" through the eyepiece or binoculars. What consistently raises on-site satisfaction is choosing targets that are large and bright relative to your field of view, rather than chasing photogenic appeal.
Bortle 6-9: Go After the Moon, Planets, and Bright Clusters
Under suburban to urban skies, narrowing your targets to objects that hold up against a bright background is a far more reliable strategy than trying to sweep for faint deep-sky objects. The headliners here are the Moon, planets, double stars, and bright open clusters. Sticking with a "find the faintest thing possible" mindset leads to frustration, but switching your target list transforms the experience.
The Moon is the most consistently rewarding object in this range. Binoculars reveal crater relief and the dark maria patterns, and a small telescope turns the terminator into a strikingly three-dimensional landscape. In urban skies, "look closely at something bright" beats "hunt for something faint" almost every time, and lunar observing is the clearest example. Planets follow the same logic: Jupiter's Galilean moons, Saturn's rings, and Venus's phases are all accessible under bright skies.
Double stars deserve attention, too. The color contrasts and separation challenges they offer are largely unaffected by Light pollution. Even under a star-poor sky, the experience of resolving what looked like a single point into two distinct stars stays memorable. At urban star parties, double stars consistently produce positive reactions.
Open clusters, chosen for brightness, remain well within range. Binoculars let you take in the cluster's extent, and a small telescope brings out the central concentration. On the other hand, pushing for faint emission nebulae or large galaxies in this range sets up a wide gap between expectation and reality. At Bortle 6-9, savoring what you can see deeply is the organizing principle.
In the city, combining celestial objects with the urban landscape adds another layer of satisfaction. The evening star above a city silhouette, or a low Moon framed by buildings -- these are scenes that stick, even at locations where raw darkness is not on your side. Whether photographing or observing, the approach here is to lean into bright targets rather than lament the sky conditions.
Here's a quick reference for choosing targets as a beginner:
| Bortle Range | Recommended Targets | Suitable Equipment |
|---|---|---|
| 1-3 | Milky Way, dark rifts, faint emission nebulae, large galaxies, starscapes | Naked eye, binoculars, wide-angle fixed-tripod photography |
| 4-5 | Open clusters, Pleiades (M45), M31 core glow, bright nebulae, globular clusters | Binoculars, small telescope |
| 6-9 | Moon, planets, double stars, bright open clusters, urban starscapes | Binoculars, small telescope, naked eye |
The "photography" note in the table refers to what captures well on camera, which doesn't match what you see with the naked eye. The faint structures that photograph beautifully at Bortle 1-3 look far more delicate in person. Conversely, at Bortle 6-9, objects that seem underwhelming to the naked eye become highly rewarding the moment you switch to bright targets like the Moon and planets.
Wrapping Up: Think Bortle + Moon Phase + Weather
The Bortle Scale is a handy shorthand -- lower numbers, darker skies. But the number alone doesn't determine what you'll actually see. Whether you're near new moon, whether the sky is truly clear, whether on-site streetlamps or parking lot lights intrude, and whether you've given your eyes enough time to dark-adapt -- accounting for all of these is what reduces stargazing disappointments. My routine is to compare my home area and a candidate site on a Light pollution map, check moon phase and cloud cover on the day, and once on-site, spend a while avoiding any light source before I look up.
Related Articles
How to Use a Light Pollution Map: 3 Steps to Finding Dark Skies
How to Use a Light Pollution Map: 3 Steps to Finding Dark Skies
Picking an observing site by map color alone often leads to disappointment -- dark on paper, but poor in practice. This guide walks you through narrowing down three or so candidate dark-sky sites near home, comparing them by Bortle class and SQM, then vetting parking, streetlights, and sightlines on Google Maps so you end up somewhere safe and genuinely dark.
When Can You See the Milky Way? Prioritizing Location, Moon Phase, and Season
When Can You See the Milky Way? Prioritizing Location, Moon Phase, and Season
If you want to spot that white band stretching across the summer sky, the first thing to check is not the season but how dark a location you can reach. The Milky Way is up there year-round, yet whether you can actually see it comes down to three factors in this order: how dark your site is, how little moonlight there is, and whether the dense core region happens to be above the horizon at that hour.
When and Where to See the Milky Way: Season, Direction, Location, and Moon Phase
When and Where to See the Milky Way: Season, Direction, Location, and Moon Phase
The Milky Way isn't something that only appears during summer festivals -- it's there all year round. What really determines whether you'll actually see it comes down to five factors: season, direction, location, moon phase, and weather. Get these right, and even beginners have a realistic shot. This guide is built for anyone wondering 'can I go see it tonight?' and covers the shortest path from naked-eye observation to fixed-tripod photography.
How to Start Stargazing: 5 Steps You Can Do Tonight
How to Start Stargazing: 5 Steps You Can Do Tonight
You don't need a telescope to start stargazing. Begin with bright, easy targets like the Moon and Venus, then gradually add binoculars and — if you want — a telescope. Starting with naked-eye objects and building from there is the approach least likely to leave you discouraged.