When and Where to See the Milky Way: Season, Direction, Location, and Moon Phase
The Milky Way isn't something that only appears around the Tanabata star festival in Japan -- it's there all year round. What truly determines whether you'll see it comes down to five factors: season, direction, location, moon phase, and weather. Nail these, and even beginners have a realistic chance. This guide is built for anyone asking "can I go see it tonight?" -- covering the shortest path from naked-eye observation to fixed-tripod photography. Under dark skies, the summer Milky Way is visible to the unaided eye as a faint band, and a camera makes it even easier to capture. From my own experience across 60-plus observation nights a year, most failed outings come down not to a lack of knowledge, but to picking the wrong conditions. By the time you finish reading, you'll have a decision flowchart for judging tonight's sky on the spot, plus a checklist covering everything down to what to bring.
The Conditions for Seeing the Milky Way -- Starting With the Bottom Line
The Big Five at a Glance
Observation difficulty sits around Level 2 (beginner) as a rough guide -- though this shifts with your location, equipment, and experience. Getting the conditions right matters more than anything else for this target, which actually works in a beginner's favor.
- Season: In the Northern Hemisphere, summer (June through September) is the easiest window. The Milky Way itself is present year-round, but summer puts the galactic center on display during convenient evening hours, making the band noticeably brighter. Aim for roughly five days either side of the new moon.
- Direction: The brightest stretch runs through the south to southeast sky. Its position shifts with season and time, but in summer, the area around Sagittarius and Scorpius is the standout -- bright enough to serve as a landmark even for first-timers.
- Location: You want low 光害 and an unobstructed southern horizon. Naked-eye viewing from city centers is extremely difficult; suburban sites are the realistic starting point. Remote dark-sky sites offer a clear advantage, but the darker the location, the more you need to plan for travel logistics and personal safety.
- Moon phase: The Milky Way is faint, so moonlight has an outsized impact. Around full moon the entire sky brightens, burying the band.
- Weather: Clear skies alone aren't enough -- cloud cover, atmospheric transparency, and humidity all play a role. On nights with thin high clouds or heavy moisture, stars may be visible while the Milky Way band itself disappears into the background.
Among these five, the factors that make or break an outing most often are moonlight and clouds. Even a well-chosen dark site fails if the moon is up or a veil of cirrus drifts in. On the flip side, a suburban field under a new-moon sky with crisp air can reveal the summer Milky Way as a faint cloud-like band -- entirely within reach.
For checking direction, tools like the National Astronomical Observatory of Japan's "Today's Sky" simulator -- where you enter a location and time to preview the sky -- are genuinely practical. Before a trip, I check how high the Milky Way's bright core will climb above the southern horizon so I'm not guessing which way to look once I arrive. (If you plan to use screenshots or embeds from such tools in your own content, verify each site's terms of use first.)
💡 Tip
If you're narrowing it down as a beginner, just locking in these four -- "summer," "new moon window," "suburban site with an open southern view," and "low cloud cover" -- already pushes your success rate way up.
今日のほしぞら - 国立天文台暦計算室
eco.mtk.nao.ac.jpThe Quick Fundamentals
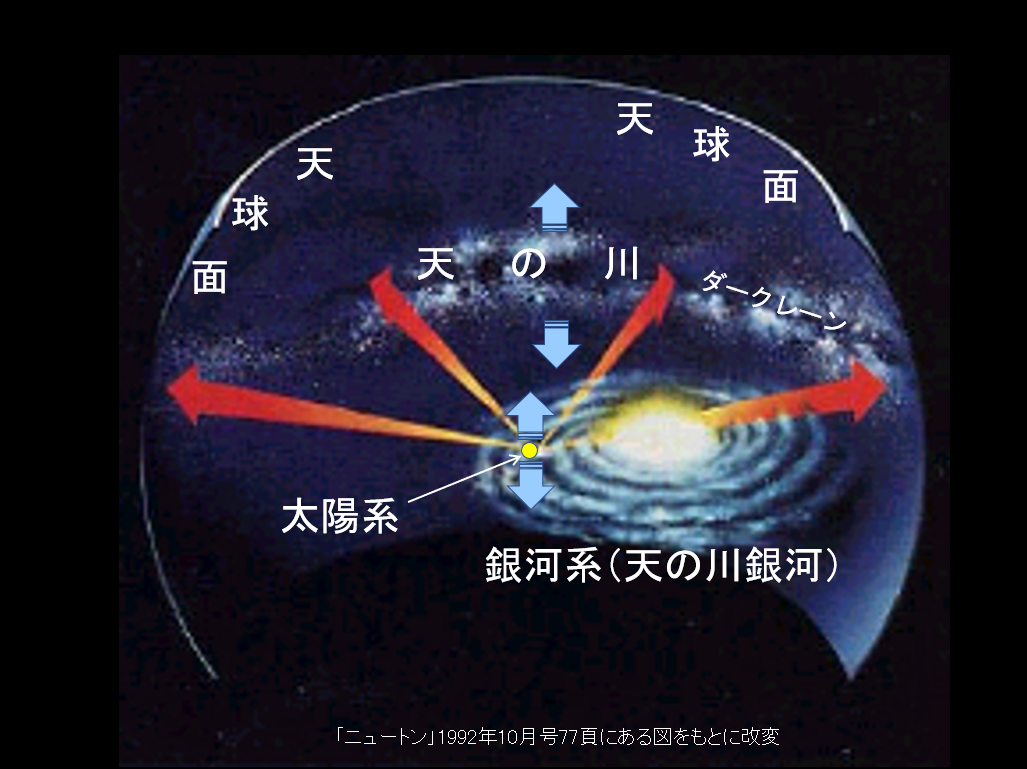
The Milky Way is our own galaxy seen from the inside as a band across the sky. That whitish streak or cloud-like glow you notice on a dark night is the combined light of countless distant stars packed along the galactic plane. Point binoculars at it, and that diffuse glow resolves into dense clusters of individual stars.
For a sense of scale: the Milky Way galaxy spans roughly 100,000 light-years in diameter, about 1,000 light-years thick through its disk, and contains an estimated 100 to 200 billion stars. The numbers are staggering, but for practical observation, think of it not as "a white cloud floating in the sky" but as "a concentration of stars too distant to separate with the naked eye."
The summer Milky Way looks particularly striking because the bright region near Sagittarius and Scorpius is the direction of the galactic center. For a deeper dive into finding and observing specific deep-sky objects along the band, see our guide to finding the Orion Nebula (M42).
天の川
月のない暗い晩に肉眼で見ると、夜空を大きく横切るように見える淡く輝く帯状の天体で、その正体は天の川銀河(銀河系)の円盤部にある無数の恒星の集団である。我々(太陽系)が中心から離れた円盤部に位置しているので、内部から見た円盤部の恒星が天球に投
astro-dic.jpWhen Is the Milky Way Visible? Best Seasons and Times
The Year-Round Picture
The Milky Way doesn't vanish after summer -- it's present all year. It isn't switching on and off. Instead, as Earth orbits and rotates, the best-visible season, time, and direction shift -- and framing it that way makes the whole pattern click. Beginners often assume "summer only" because that's when the galactic center rises high during convenient evening hours in the Northern Hemisphere, making the bright core around Sagittarius and Scorpius easy to spot.
Here's what each season actually feels like in the field: spring means "it stretches up in the predawn hours," summer means "it's the main event from dusk onward," autumn means "it tilts westward early in the evening," and winter means "you're tracing a fainter band." I hear this question constantly at observation gatherings -- no, the Milky Way isn't born fresh each summer. Summer is the easy-viewing season; the other seasons are about reading subtler appearances.
Time of night matters too. Within any given season, the Milky Way shifts position from astronomical twilight through midnight and into the predawn hours. A band that felt low and faint at dusk may climb to a far more impressive altitude a few hours later. Especially from spring into early summer, just knowing that "it rises if you wait" saves many people from giving up too soon.
天文の基礎知識:14. 天の川 - アストロアーツ
www.astroarts.co.jpSeasonal Timing and Direction Trends
Seasonal differences are easiest to grasp by watching the angle of the band. Roughly: spring -- diagonal; summer -- standing tall; autumn -- diagonal again; winter -- nearly horizontal. The exact angle shifts with date and time, but having this mental model helps you orient at the site.
Spring places the Milky Way's bright core below the horizon during evening hours, so the predawn window from midnight onward is your best bet. Early in the night the band is barely present, and even at a dark site you may feel like "nothing's there." In reality, a diagonal streak is gradually emerging from the southeast. Staying put for a few hours transforms the view -- spring is the quintessential "patience pays off" season.
Summer is the most straightforward. From astronomical twilight through around midnight, the band is easy to find. It appears to stand nearly vertical from the south to southeast, with the galactic center climbing high enough for the naked eye to pick up "a whitish streak." At a dark site, the band from Sagittarius through Cygnus can look like it splits the sky in two -- unmistakable even for a first-timer.
Autumn shifts the impression: the band that stood tall in summer now tilts and leans westward. The best window is the first half of the night, and as hours pass it sinks further toward the western horizon. There's still a residual ease from summer's brightness, but the peak window is shorter -- "it slipped below the treeline while I wasn't paying attention" is a common autumn story.
Winter brings a different kind of observation. Instead of summer's dramatic galactic center, you're tracing a relatively faint band that sits close to horizontal. The predawn hours may offer the best impression, but overall it lacks the "you can't miss it" quality of summer. The Milky Way is undeniably present all year, yet the gap in visibility is real -- and winter drives that point home.
A quick note on the Tanabata festival (July 7): fixing your Milky Way outing to that specific calendar date isn't practical. Moon phase and weather dictate conditions far more than the date. If July 7 falls on a bright-moon night or is overcast, you won't see much. A different date under a new moon and clear sky will be vastly better.
Making the Most of the New Moon Window
When scheduling a Milky Way outing, five days either side of the new moon is the primary target window. This isn't because stars magically multiply when the moon is absent -- it's because moonlight raises the background brightness of the entire sky. The Milky Way is inherently a faint band, so even a modest increase in sky glow kills the contrast. Naked-eye viewing is hit hardest: even at a dark site, a moon above the horizon often produces the frustrating result of "plenty of stars, but the Milky Way is washed out."
In practice, you don't need to fixate on the exact new-moon date. The five-day window on either side is generous enough to plan around, and what really matters is moonrise and moonset times. If the moon is below the horizon during the hours you plan to observe, the sky stays dark regardless of the calendar phase. Conversely, even a thin crescent high in the sky during your observation window degrades conditions.
When I'm planning a trip, I don't just look for "the date closest to new moon" -- I check whether moonlight intrudes on the specific hours I want to observe. This approach widens your candidate dates and makes scheduling much more flexible. Reading the timing of dark hours, rather than relying on phase alone, consistently produces better results.
ℹ️ Note
For the Milky Way, "pick a date near the new moon when the moon is absent during your target hours" beats "go out on July 7 because it's the star festival" every time for practical planning.
Even during the new-moon window, the sky immediately after astronomical twilight may still carry residual blue brightness that suppresses the band's contrast. As the night deepens, the view stabilizes -- and depending on the season, the band may also gain altitude heading toward predawn. Moon phase isn't the only clock that matters: whether you can wait until the sky is truly dark shapes the result just as much.
Which Direction to Look: A Season-by-Season Guide
Spring: Band Sits Low, Predawn Toward the Southeast
Spring is the season where the Milky Way is easiest to lose. There's no thick, obvious summer band waiting for you. Instead, a faint streak emerges low in the southeast sky from midnight into predawn, lying nearly horizontal and seeping into view like a wispy cloud at the edge of the sky.
During this period, scanning the sky at 9 or 10 PM and concluding "there's nothing" is a common mistake. Staying a few hours makes a dramatic difference. In my own spring sessions, the band almost always becomes more convincing closer to dawn than right after arrival. The low southeastern horizon catches ground-level light and atmospheric extinction, so wait for the band to lift a bit above the horizon rather than searching right along the skyline.
Summer: Easiest Season. Band Rises From South to Southeast
Summer is the best season for anyone seeing the Milky Way for the first time. The target direction is south to southeast, and the brightest stretch runs through the Sagittarius-Scorpius region -- the galactic center. At the site, a whitish band standing up from the southern sky is your confirmation.
If the Tanabata tradition has already familiarized you with the summer sky, the Summer Triangle makes an excellent entry point. Find Vega in Lyra, Deneb in Cygnus, and Altair in Aquila -- the faint band crossing through that triangle is the Milky Way. Trace your gaze southward from there, and you'll run into the brighter, denser core.
Three reference points are all you need for summer: "south to southeast," "the Sagittarius-Scorpius area," and "use the Summer Triangle as a gateway." At dark sites, the broad glow around Sagittarius may actually register before the thinner stream near Cygnus. The southern horizon is subject to atmospheric extinction even under dark skies, so the band improves as it gains altitude -- give it a bit of time rather than looking only at the lowest moment.
Autumn: Band Tilts From the Zenith Toward the West
Autumn is when the summer band tilts from near the zenith toward the western sky. Some residual ease from summer remains, but rather than watching a band climb, you're now following a band as it arcs overhead and sinks westward -- like pressing fast-forward on a summer view.
At the site, start by scanning near the zenith for a faint streak, then trace it westward. The concentration visible low in the south during summer is no longer front and center, so hunting along the horizon first tends to miss it. Autumn is the season where looking high beats looking low.
Winter: Low and Faint, but Present
Winter's Milky Way is often assumed to be nonexistent, but it's there. What's missing is the dramatic galactic center; instead, you're working with a faint band hugging the lower sky. "Sensing its presence" may be more accurate than "seeing it," and this is the hardest season for beginners to identify the band.
The key is not to carry summer expectations into winter. Looking for a thick, bright streak will cause you to overlook it. Tracing a chain of star-rich areas is more realistic. In my own winter sessions, I think of it less as "finding a white river" and more as "reading a corridor of higher star density." Under excellent conditions it's rewarding, but spotting it at a glance purely by direction is a tall order.
Using Star Chart Apps and Online Planetariums
The most practical way to avoid confusion at the site is to preview the Milky Way's orientation and altitude for your specific time and location beforehand. Smartphone planetarium apps work well; for browser-based tools, the National Astronomical Observatory of Japan's "Today's Sky" lets you plug in coordinates and a time to get a visual bearing.
The process is simple: set your observation site, dial in the planned time, and check the south-to-southeast sky. In summer, look for Sagittarius, Scorpius, and the Summer Triangle. I find that once I match the on-screen triangle to the real Vega-Deneb-Altair overhead, the entire sky suddenly clicks into place.
If you want to scout for 光害 as well, Light Pollution Map lets you survey brightness levels around your candidate site. A spot that looks fine on the map can still have city glow right along the southern horizon -- exactly where the Milky Way's best section sits. In the field, timing your observation for when the band has climbed above that horizon glow makes a visible difference.
💡 Tip
Memorizing the Summer Triangle, the Sagittarius-Scorpius area, and the south-to-southeast direction on screen beforehand shifts your on-site experience from "hunting for a point" to "reading the whole band."
How to Judge a Milky Way Viewing Location
Understanding and Gauging Light Pollution
Whether the Milky Way is visible starts with how dark the sky itself is. For naked-eye viewing this factor dominates: urban skies don't just reduce star counts -- they bury faint extended objects like the Milky Way band under a bright background. The classic frustration of "I can see stars but can't find the Milky Way" is almost always a 光害 problem, not a technique problem.
As a rough framework: city centers are extremely tough for naked-eye viewing, suburban sites are realistic candidates, and mountain areas, coastlines, lakeshores, and highland plateaus are advantageous. Even moving a modest distance from town can spike the star count. The summer galactic center sits fairly low in the sky, so you need darkness not just overhead but down toward the southern horizon.
Light Pollution Map displays sky brightness in mag/arcsec^2. Higher numbers mean darker skies. For example, a 20.0 mag/arcsec^2 sky is roughly 6.3 times brighter than a 22.0 mag/arcsec^2 baseline. These figures are estimates -- actual visibility depends on weather, transparency, humidity, terrain, and the observer's eyesight. In general, readings in the low 20s mean "lots of stars, but the fainter parts of the Milky Way are thin." Once you reach the mid-21 range, with a new moon and an open southern horizon, "picking up the band with the naked eye" becomes realistic. On the other end, around 18.5 mag/arcsec^2 near urban areas -- roughly 25 times brighter than the 22.0 baseline -- naked-eye Milky Way viewing is essentially off the table.
Terrain: Prioritize an Open Southern View
Even at a dark site, a southern horizon blocked by mountains, buildings, or tree lines costs you the best part of the Milky Way. The summer band's brightest section hangs in the south-to-southeast at moderate altitude, so what matters more than a wide-open overhead view is an unobstructed sightline from the horizon upward along the south.
Highland plateaus (such as Utsukushigahara Plateau in Nagano Prefecture, Japan) and coastal areas are favored not just for darkness but for this low-altitude clearance. When I evaluate a site, my first check is "how far down toward the southern horizon can I actually see?" Overhead sky can be expansive, yet a ridge or tree line hiding just the southern strip is surprisingly common. A parking pullout, a levee top, or an open lakeshore that clears the south can outperform a nominally darker spot with a blocked view. Waiting for the band to climb higher helps, but starting with an open southern horizon makes both observing and photography easier from the start.
Beyond terrain, nearby artificial light sources affect dark adaptation. A streetlight directly in front of you, headlights from passing cars, or frequent vehicle traffic at a lot entrance all prevent your eyes from fully adjusting. Even brief exposure to bright light can erase minutes of adaptation. Shifting your position a few meters to put a guardrail or hedge between you and the light source, or simply angling your view to keep direct lights out of your field, noticeably improves what you can see.
Light Pollution Maps and On-Site Scouting
Combining desktop map research with on-the-ground reconnaissance raises your accuracy. The free Light Pollution Map is a solid starting tool -- it shows regional brightness so you can judge "which direction from the city gets dark" and "is there a lit-up town south of my candidate site?" Before a trip, I check not just the candidate site's brightness but what lies to its south. A site can be dark itself while still suffering from a city glow washing out the low southern sky.
When reading the numbers, don't relax just because a spot looks slightly darker on the map. A sky at around 21.0 mag/arcsec^2 is decent for a suburban area but still roughly 2.5 times brighter than a 22.0 baseline, meaning the fainter portions of the Milky Way may not stand out to the naked eye. Once you approach 21.5 mag/arcsec^2, conditions with a new moon and clear southern horizon start working for visual detection. Holding these numbers in mind prevents overestimating a site.
Maps alone won't tell you about on-site practicalities. During a daytime scout, check parking access, restroom availability, foot traffic and vehicle traffic, and whether you can safely look up without tripping. Dark sites often lack facilities, and arriving at midnight only to discover problems kills the whole outing. A site that's dark on the map but flanked by streetlights, or whose parking lot closes at sundown, is a common letdown. The ideal observation site isn't just dark -- it's dark, south-facing, and comfortable to stand in.
Light pollution map
www.lightpollutionmap.infoCity, Suburban, and Remote Sites Compared
Realistic expectations vary sharply across these three tiers. City sites offer easy access and work for practicing star chart use and camera setup, but the Milky Way band is extremely hard to detect with the naked eye. You can learn constellations and compass bearings, but the "white band across the sky" experience is unlikely.
Suburban sites are the most practical for beginners. A short drive to a riverbank, lakeshore, coast, or hilltop overlook with an open southern horizon can reveal the gap between city and country skies immediately. Some 光害 remains, but with the right spot, naked-eye detection and photography are both within reach. In my experience, this is where most people score their first definitive "I saw it" moment.
Remote sites -- mountain areas, highland plateaus, coastlines, and lakeshores well away from towns -- take the experience further. The sky is a full step darker, and the band's brightness variations become visible to the naked eye. Coastlines and lakeshores make it easy to secure a southern view; mountains and highlands get you far from city glow. The trade-off is longer travel, more logistical planning, and a greater need to confirm safety and facilities in advance. Satisfaction is high, but convenience favors suburban sites.
A practical way to use all three: cities for scouting and orientation practice, suburbs for your first real success, remote sites for optimal conditions. The Milky Way isn't an object that looks the same everywhere -- location choice visibly changes the experience. Factoring in darkness, southern-sky clearance, and freedom from direct light sources into your site selection gives you the best odds of a rewarding night.
Pre-Observation Checklist: Moon Phase, Cloud Cover, Humidity, and Safety
Checking Moon Phase and Moonrise/Moonset
Even a perfect location falls flat if the moon is working against you. Before heading out, check the moon phase and moonrise/moonset times. While the moon is above the horizon, it floods the sky from a direction independent of any ground-based 光害, crushing the contrast of a faint band like the Milky Way.
The sweet spot is roughly five days either side of the new moon. This window keeps the sky dark enough for both naked-eye and photographic success. But "only the exact new-moon date works" is a myth. If the moon sets before your planned observation window, you're in the clear even if the calendar phase has advanced a few days. Conversely, heading out during lingering twilight even near new moon means the sky isn't truly dark yet. Before a trip, I look not at the calendar phase but at "is the moon above the horizon during my target hours?"
Having moonrise and moonset times on hand makes the whole night flow better. The National Astronomical Observatory of Japan's "Today's Sky" tool lets you check both Milky Way position and moon position for any location and time. That eliminates the on-site surprise of "the southern sky looks great, but the moon is still glowing low in the east."
ℹ️ Note
The moon's impact isn't just "present or absent" -- it's "where is it during the hours you care about?" A night that starts under moonlight can transform once the moon sets and the sky tightens, delivering surprisingly high satisfaction in the second half.
Checking Cloud Cover, Transparency, and Humidity
Weather is the next filter. For stargazing, a simple "sunny" or "clear" forecast isn't enough. What you need to check is cloud coverage, atmospheric transparency, and humidity -- and ideally, satellite imagery to catch thin high-altitude clouds that surface forecasts miss. Daytime sunshine means nothing if a sheet of cirrus spreads after sunset. Under such skies the moon and bright stars remain visible, but the Milky Way's faint band vanishes.
A practical approach: check both the cloud coverage forecast and satellite imagery on your preferred weather service. Even if the cloud fraction looks low, satellite images showing a cloud band approaching from upwind mean the second half of the night may deteriorate. Before a trip I check not just the pinpoint forecast but whether any cloud mass is moving in from the windward side. Clouds rolling over a mountain range into your site's airspace are more common than you'd expect.
Transparency is the sleeper variable. A clear sky loaded with water vapor or thin haze yields a reduced star count and a Milky Way that dissolves into a whitish wash. High-humidity nights blur the low-altitude sky especially, right where the southern Milky Way band sits. Coastal areas, lakeshores, and post-rain evenings sometimes deliver excellent transparency, but ground-level moisture that lingers can undercut expectations. The lower the Milky Way's altitude for the season, the more this factor bites.
Nights where "stars are out but the Milky Way seems thin" are more often caused by humidity and transparency than by clouds. The sky doesn't lack darkness -- the air itself is scattering light. Building a habit of checking humidity alongside cloud cover before leaving home measurably reduces wasted trips.
Safety, Etiquette, and Gear
Darker sites mean better skies and greater need for preparation. First priority: dark adaptation. Right after arriving, the sky may look disappointing -- but give your eyes at least 15 minutes to adjust and the star count climbs noticeably. Any burst of white light resets the process, so use a red-filtered light for hands-free tasks, dim your phone screen as far as it goes, and silence notification pop-ups that flash unexpectedly bright.
Gear doesn't need to be elaborate, but warm layers, insect repellent, sturdy shoes, a backup battery, and water pay off every time. Even at summer lowland sites, standing still after midnight chills you. Spring and autumn at elevation amplify the gap between daytime and nighttime temperatures. I've learned the hard way that nights I underdress are nights my focus drops early. Closed-toe shoes that protect the ankle beat sandals on grass or unpaved ground. A power bank keeps your phone available for star charts and communication.
For on-site logistics, locate restrooms, confirm parking availability, and check whether the area closes at night before you go. Dark observation sites often have nothing nearby, and discovering problems after a midnight drive ends the session before it starts. Park only where you won't block local traffic, farm access roads, or turnaround spaces. Near residences, voices and car-door sounds carry further than you'd expect after dark.
On etiquette, keep your headlamp pointed at your feet. Shining it toward someone's face, the sky, or a parked vehicle wipes out everyone's dark adaptation instantly. High beams are off-limits, and parking in a spot where every arrival's headlights sweep across the observing area makes the site impractical. At popular photography locations, even a small light registers in long exposures. Move quietly, keep necessary lights low and brief. Sites where this baseline is respected are comfortable for everyone -- including first-time visitors.
Naked Eye, Binoculars, or Camera: How the View Differs
What the Naked Eye Actually Shows You
The Milky Way through the naked eye does not look like the vivid white band in posters or social media photos. In reality, the baseline experience is a faint, cloud-like band draped across the sky. Rather than a river of densely packed stars, you first notice "that part of the sky is slightly brighter than the rest." Beginners often suspect they're not seeing it at all, but under dark skies with adapted eyes, the band's presence gradually asserts itself.
This view is governed by 光害 and moonlight. At a site where Light Pollution Map reads 18.5 mag/arcsec^2, the sky is bright enough that even the summer galactic center is essentially invisible to the unaided eye. Move to suburban darkness around 21.0 mag/arcsec^2 and "band-like quality" starts appearing on good nights, though fine brightness variations remain elusive. Naked-eye viewing is the most accessible method -- no equipment needed -- but it's also the method most tightly constrained by sky darkness.
At observation events, first-timers often say "I expected it to be much whiter and more obvious." The viewing technique that helps: instead of staring directly at one spot, take in a wider field around Sagittarius or Cygnus. The Milky Way is an extended object you perceive as an area, not a point. Recognizing the faint band counts as a success. Calibrating expectations here changes on-site satisfaction dramatically.
The Binocular View
Binoculars shift the Milky Way from "a white band" to "a mass of individual stars." Where the naked eye sees a uniform faint glow, binoculars resolve it into dense clusters of pinpoint stars. The 7x50 to 10x50 range hits the sweet spot of wide field and light-gathering power for Milky Way sweeping.
The difference is unmistakable. Regions that looked like "vaguely bright haze" become packed star fields, and you start distinguishing denser patches from thinner ones. Tracing from Sagittarius through Scutum to Cygnus, the shifting star density along the band becomes obvious. On nights where the naked-eye impression is "faint," lifting binoculars often flips the experience from uncertain to definitive.
For beginners, binoculars occupy a powerful middle ground: higher success rate than the naked eye, far less setup than photography. You still need reasonably dark skies, but if the band is even marginally visible to the unaided eye, binoculars make "where am I looking" suddenly obvious. Under heavy 光害, though, binoculars can't overcome a bright sky background. Think of it as: naked eye for presence detection, binoculars for content -- that division of labor keeps expectations realistic.
💡 Tip
For Milky Way viewing, wider-field binoculars beat high magnification. They let you sweep the full band and pick up the sense of dense star clouds more naturally.
What Fixed-Tripod Photography Reveals
Mounting a camera on a tripod and exposing changes the game. This is the single biggest difference between observing and photographing the Milky Way. The sensor accumulates light over time, so a band that appeared as a mere whisper to the eye becomes a distinct structure in the image. On top of that, contrast gets boosted during processing or even on the camera's rear screen, producing results that look far more dramatic than the live view.
Fixed-tripod shooting with a wide-angle lens and a longer exposure produces results quickly. A starting point: 14 mm to 20 mm focal length, f/2 to f/2.8, ISO 1600 to 6400, 20 to 30 seconds of exposure. For example, 16 mm yields roughly 31 seconds under the 500 Rule, keeping stars close to pinpoints and delivering a rewarding first frame. Under these conditions, even a suburban sky yields a distinct Milky Way band in the photograph.
This means beginner success rate typically runs fixed-tripod photography > binoculars > naked eye. The naked eye takes whatever the sky gives, and the threshold for detection is tight. Binoculars bump you up a tier by resolving star density. Photography stacks light over time, so even a "maybe I see something" night can produce a frame where the band is clearly present -- boosting satisfaction after the fact. It's not unusual for someone to feel "it was faint tonight" and then see the band pop in the image at home.
That said, mistaking the photograph for the live experience creates a gap. Photography doesn't fabricate something that isn't there -- it records it more strongly than the eye can perceive in real time. Knowing this distinction beforehand changes how beginners choose equipment and set expectations. The on-site reality is subtle; the recorded result is richer. Accept both, and gear choices become easier.
Photographing the Milky Way: Beginner Settings Guide
Essential Gear and Lens Choice
For fixed-tripod Milky Way photography, the core kit is camera body, tripod, and wide-angle lens. Adding a remote shutter release helps avoid vibration from pressing the button, but in the field, tripod stability often matters more than any single setting. On windy nights or soft ground, just spreading the legs firmly and locking them makes a measurable difference in keeper rate.
Lenses in the 14 to 20 mm range work best, with a maximum aperture of f/2 to f/2.8 -- at minimum f/2.8 or faster. Wide angles are favored not only because they frame more of the band but because they tolerate longer exposures before star trailing becomes visible. When beginners at observation events ask me about settings, this focal-length range is always where I start. Standard or telephoto lenses can capture the Milky Way too, but the tighter framing raises the difficulty.
On the settings side, turn image stabilization OFF when shooting on a tripod. The stabilization mechanism can introduce movement when there's no hand shake to counter. A self-timer works in a pinch, but a cable release or 2-second timer is smoother. White balance on auto records usable data, but setting it toward a lower (tungsten-ish) value prevents the sky from swinging too far into blue or purple and makes on-site review easier.
Core Settings: ISO, Shutter Speed, Aperture
A practical starting point: ISO 1600 to 6400, shutter speed 20 to 30 seconds, lens wide open or close to it. Under truly dark skies, a lower ISO suffices; at brighter suburban sites, push ISO higher to pull the band out of the background. The logic is straightforward: aperture lets in as much light as possible, shutter speed stays within the range that keeps stars as points, and ISO fills the remaining gap.
A common question: "Is a brighter exposure always better?" For Milky Way work, no. You don't need to light the sky like daytime. If the rear screen looks slightly dim but star detail and band structure are intact, that's a solid exposure. Overexposing washes the sky into a flat gray-white and flattens the Milky Way's three-dimensional quality. My habit is to fire one frame at around 20 seconds, check the sky brightness, and decide whether to bump ISO one stop.
Even on moonless nights, background sky brightness varies enormously with location. Suburban starting points tend to fall around ISO 3200; darker sites may sit comfortably at ISO 1600. At 光害-affected sites, pushing ISO to 6400 sometimes makes the sky glow more prominent than the Milky Way itself. In that situation, reframing to point away from the worst light source beats cranking sensitivity higher.
The 500 Rule and Exposure Limits
The well-known 500 Rule provides a quick ceiling for shutter speed: 500 / focal length = approximate maximum exposure in seconds. At 16 mm that's about 31 seconds; at 50 mm, about 10 seconds. Wider lenses buy longer exposures; longer focal lengths show star trailing sooner.
This rule isn't a guarantee of perfectly frozen stars -- it's a practical starting point for beginners to set exposure without guessing. On high-resolution sensors viewed at 100%, the upper limit may still show slight elongation. I typically set my exposure a touch shorter than the 500 Rule output: for 16 mm, somewhere under 30 seconds; for 20 mm, low 20s. That margin holds up under pixel-level inspection.
⚠️ Warning
Use the 500 Rule as a first yardstick for shutter speed to prevent star trailing. If the frame looks underexposed, raise ISO before extending exposure time -- that keeps stars as points.
Focusing and RAW
The most common stumbling block in Milky Way photography isn't exposure -- it's focus. Autofocus hunts in the dark, so the standard approach is manual focus (MF). Switch to live view, find a bright star or distant strong light, magnify the screen, and turn the focus ring until the point is at its smallest and sharpest. Simply dialing the lens to the infinity mark often lands slightly off.
Even after nailing focus, temperature shifts or accidental contact can nudge the ring. Discovering on the first frame that everything is soft -- and only catching it when you magnify on the rear screen -- is extremely common. Tape the ring lightly once you've confirmed sharpness, or position the camera so the ring is hard to brush. On-site confirmation means magnifying the image every time; the unmagnified rear screen can look sharp while the stars are actually bloated.
Save in RAW. RAW preserves the flexibility to adjust brightness, white balance, and color casts after the fact, rescuing slightly underexposed frames that would be locked in as JPEGs. JPEG compresses the subtle tonal gradations of the sky and the Milky Way's faint structure, narrowing your editing headroom. Recording RAW first and deciding on processing later consistently reduces the number of lost frames.
Shooting With a Smartphone
With the right conditions, a smartphone can absolutely capture the Milky Way's atmosphere. The critical factor -- even more than with a dedicated camera -- is stability. Handheld shots are essentially impossible; a compact tripod and phone clamp are prerequisites. Modern smartphones with night mode or dedicated astrophotography modes run powerful computational stacking that can produce surprisingly good results. If your phone offers such a mode, start by letting the automatic processing do the heavy lifting.
For apps with manual controls, the approach mirrors a camera: use the widest lens option, extend exposure, and raise sensitivity. If the app supports RAW capture, choose it. Smartphones apply aggressive processing to JPEGs -- sharpening, noise reduction, color adjustments -- that can lock in choices you'd rather make yourself. RAW preserves the band's tonal subtlety for later editing.
Smartphone photography pairs well with the mindset of "recording the spot where I saw the band with my own eyes." It lacks the control of a dedicated camera, but with solid stabilization and the right shooting mode, the result doubles as both observation log and a satisfying image. On suburban nights with genuinely dark skies, a phone can handle position confirmation and documentation in a single shot.
Site Selection Principles
When choosing a spot for the Milky Way, thinking about whether the sky conditions are right beats asking "is this a famous scenic viewpoint?" My first check at any site is the southern-sky clearance and surrounding light, not the scenery. The summer Milky Way's highlight sits in the southern sky, so mountains, buildings, or tree lines blocking the low southern horizon mean the lower half of the band vanishes -- even if the map looked promising. A coastal parking area or highland pullout with an open southern view often outperforms a nominally darker site with an obstructed horizon.
The other big variable is how little 光害 there is. Moving away from a city helps immediately, but within suburban zones, "south faces a town" versus "south faces the sea or mountain wilderness" creates a visible difference. When scouting candidates, I check Light Pollution Map for the surrounding brightness pattern and, on site, note which directions hold streetlights, convenience stores, road lighting, and distant city glow. A map reading of around 21.0 mag/arcsec^2 puts you a step darker than average countryside -- the Milky Way is conditionally visible to the naked eye, but fainter details still wash out, and binoculars sharpen the view one tier. At 18.5 mag/arcsec^2 near urban areas, the sky is roughly 25 times brighter than a 22.0 baseline, making naked-eye detection very difficult. Having these numbers in mind separates "technically reachable" from "worth the trip."
On the ground, safety and facilities matter as much as darkness. A dark forest-road shoulder or an unmarked field isn't beginner-friendly. Nighttime restroom access, secure parking, distance from cliff edges or surf, and cell reception all shift your comfort level -- and comfort directly affects how long you stay and how much you see. Sites that are dark but have treacherous footing or no amenities are more common than you'd expect. Choosing a site by pairing "darkness" with "safe, comfortable place to stand" raises both your detection rate and your overall satisfaction.
💡 Tip
Visiting a new site in daylight first dramatically reduces nighttime difficulty. You'll already know how far south the horizon opens, where the streetlights are, and where to retreat if needed -- so arriving after dark feels far less chaotic.
Dark Sky Reserves in Japan
When considering observation sites in Japan, dark sky reserves are a useful reference point. These aren't simply "places where stars happen to look great." The designation evaluates not only sky darkness but also active efforts to reduce 光害 and manage outdoor lighting at the community level. A naturally dark area that hasn't addressed its lighting practices doesn't qualify -- and that's what separates these reserves from generic scenic spots.
Japan has several recognized dark sky sites, and it's best to cite them with a date reference since designations evolve. As of 2025, notable domestic examples include Iriomote-Ishigaki National Park (Okinawa Prefecture), Kozushima Island (Tokyo Prefecture), Bisei Town in Ibara City (Okayama Prefecture), and Minamirokurosshi in Ono City (Fukui Prefecture). Each earned recognition not just for dark skies but for sustained community-level conservation of the night environment. Their reputations rest on operational commitment, not scenery alone.
From personal experience, these reserves tend to be more comfortable for observation than "randomly dark" locations. Stray lighting is minimized, and the general approach to visitors and signage is more considered. For a road trip to a remote site, whether the location is set up for stargazing -- not just dark -- makes a practical difference. The dark sky reserve label serves as a compact indicator of both sky quality and conservation ethic.
A note on global counts: the total number of International Dark Sky Places changes annually. The figure stood at 244 in April 2025 and 254 by September 2025, for example, so citing a date alongside any worldwide count keeps the information accurate. A fixed number without a timestamp drifts out of date quickly.
Building a Step-by-Step Trip Plan
Site selection works better as a progression than a leap to the darkest possible location. The sequence I recommend to beginners: start at a nearby suburban site, then extend to highlands or coastline, and after that plan a trip to a dark sky reserve.
The first tier -- suburban outings -- is less about the view and more about learning "can I actually identify the Milky Way's position with my own eyes?" and "how long does setup take?" Figuring out your gear workflow at a convenient location beats discovering it for the first time at a remote site. In practice, most first-timers struggle not with finding stars but with organizing bags in the dark and learning not to flash their lights.
At the second tier, the site-selection principles kick in directly. Highland plateaus offer open horizons; coastline sites with the sea to the south guarantee southern clearance. This is where most people hit the "I had no idea the difference was this dramatic" moment. Coastal sites in particular gain a lot from an unobstructed southern sky, and highlands reduce ground-level light interference.
The third tier -- a dark sky reserve trip -- brings not just exceptional darkness but an appreciation for why these communities protect their night skies. At this stage, factor in travel time, overnight logistics, moon-phase coordination, and an on-site schedule. To avoid arriving under a bright moon or after the prime window has passed, check Milky Way direction and altitude with a tool like "Today's Sky" and confirm site darkness on the map. For instance, if you know a new-moon night offers the Milky Way at about 35 degrees altitude at 9 PM at a site reading around 21.5 mag/arcsec^2, you can evaluate the southern clearance on a map and feel confident in the plan.
Following this progression shifts site selection from "going somewhere famous" to "targeting conditions." Choosing by sky quality and on-site usability rather than by name recognition measurably raises your Milky Way success rate.
Summary: Tonight's Decision Flow
The most practical approach is to lock in a fixed sequence for your pre-outing checks. Check the moon phase, check the weather, choose a site, adapt your eyes on arrival, and move to photography if you want to. This order prevents the classic blunders: "the moon was bright and I didn't check," "the sky was clear but the south was blocked." In my experience, the failures that sting most happen before touching any equipment. A few minutes of planning before leaving home changes the night's outcome more than any gear upgrade.
Tonight's Checklist
Start with moon phase. Confirm you're within the new-moon window; if the moon is strong, save the trip for another night. Once that's cleared, check the weather -- not just a "clear" icon, but cloud coverage and humidity, to dodge nights where the sky turns hazy.
Next, choose a site. Prioritize "dark" and "south is open" equally. A suburban area with city glow filling the southern horizon will bury the Milky Way's best section. On arrival, resist the urge to scan the sky immediately; reduce all lights and begin dark adaptation first. Once you've identified the band's position with the naked eye, transition to fixed-tripod photography settings if you'd like a recorded result.
As a concrete action list for tonight:
- Check a moon phase calendar for tonight's lunar conditions
- Review the weather forecast for cloud coverage and humidity
- Choose a dark location with a wide-open southern sky
- On site, minimize screens and lights to build dark adaptation
- If the band is hard to spot visually, switch to fixed-tripod photography
ℹ️ Note
When in doubt, check "is the south open?" before "is it dark enough?" -- that single filter cuts out a surprising number of disappointing sites. Even numerically decent locations can fail if the southern low sky is blocked.
Next Steps
To run through tonight's decision in the shortest time, fix the tool order too. Moon phase calendar for lunar conditions, then your weather service for cloud cover and humidity, then Light Pollution Map to narrow site candidates. Bright spots on the map translate to bright background skies on the ground, working against naked-eye viewing. Even one step darker on the scale shifts the sky impression noticeably.
Once you've picked a site, finish with a star chart app or the "Today's Sky" tool to confirm where in the south to look at your planned time. With that preparation, you arrive at the site holding a specific direction rather than searching blind -- and search time shrinks. Tonight's flow in one line: moon phase calendar, weather service, Light Pollution Map, star chart app. Keeping that sequence consistent is all it takes to make Milky Way observation a planned activity rather than a gamble.
Appendix: Comparisons and Baseline Data
For observation sites, think of it as: cities are for scouting and practice, suburbs are the most realistic bet, and remote sites deliver the highest success rate at the cost of more preparation. In my experience, skipping straight to a famous remote site on the first attempt produces more frustration than starting closer to home and building from there. Cities offer easy access but heavy 光害 that makes naked-eye viewing impractical; they're useful for compass orientation and camera-setup practice. Remote sites win on sky darkness but require travel planning and nighttime logistics.
Viewing-method expectations are worth calibrating upfront too. Naked-eye viewing needs no gear but depends most heavily on conditions; binoculars reveal the dense star-cloud texture; fixed-tripod photography provides the clearest confirmation of the band's presence. At observation events, binoculars tend to resolve the "did I actually see it?" uncertainty, and people who want a definitive record naturally move to a camera. The progression -- faint to the eye, richer through binoculars, structurally detailed in a photograph -- is realistic to keep in mind.
For a side-by-side overview:
| Category | Option | Advantage | Caveat |
|---|---|---|---|
| Site | City | Easy access, good for scouting | Heavy light pollution; naked-eye Milky Way is very difficult |
| Site | Suburban | Realistic success rate with manageable travel | Results depend heavily on southern-sky clearance |
| Site | Remote | Naked-eye viewing feasible; best for photography | Requires travel planning and safety preparation |
| Method | Naked eye | No equipment needed; easiest to start | Poor conditions make detection very difficult |
| Method | Binoculars | Reveals star density and band structure | Limited benefit under bright skies |
| Method | Fixed-tripod photo | Strongest confirmation of the band | Requires camera and tripod |
A sense of the Milky Way's scale adds depth to the experience. As multiple references describe, our galaxy spans roughly 100,000 light-years in diameter, its disk is about 1,000 light-years thick, and it contains an estimated 100 to 200 billion stars. Estimates vary across sources, so treat these as order-of-magnitude figures. On a dark night, carrying this knowledge transforms the view from "a white streak" into "looking along the interior of a galaxy" -- and that shift in perspective is quietly powerful.
Related Articles
When Can You See the Milky Way? Prioritizing Location, Moon Phase, and Season
When Can You See the Milky Way? Prioritizing Location, Moon Phase, and Season
If you want to spot that white band stretching across the summer sky, the first thing to check is not the season but how dark a location you can reach. The Milky Way is up there year-round, yet whether you can actually see it comes down to three factors in this order: how dark your site is, how little moonlight there is, and whether the dense core region happens to be above the horizon at that hour.
The Bortle Scale Explained: What Classes 1 Through 9 Really Mean
The Bortle Scale Explained: What Classes 1 Through 9 Really Mean
When searching for dark-sky sites, you'll encounter terms like the Bortle Scale, SQM, and NELM, but the numbers alone don't always convey how dark a sky actually is. This guide breaks down how to read night-sky darkness for beginners heading out to stargaze, as well as anyone who stares at light pollution maps and still isn't sure where to go.
How to Start Astrophotography: Camera Settings for Smartphones and DSLRs
How to Start Astrophotography: Camera Settings for Smartphones and DSLRs
Star photography might seem daunting at first, but with a fixed tripod setup — whether you're using a smartphone or a mirrorless camera — you can nail your first shot tonight. This practical guide is for beginners who aren't sure what settings to use, walking you through exact values for ISO, shutter speed, aperture, and focal length in the order you'll actually need them in the field.
Is the Achi Village Night Tour Worth It? What Japan's No. 1 Stargazing Claim Really Means and How to Prepare
Is the Achi Village Night Tour Worth It? What Japan's No. 1 Stargazing Claim Really Means and How to Prepare
On a night when conditions align, the sky over Achi Village in Japan is genuinely breathtaking. That said, the 'No. 1 in Japan' label traces back to a 2006 Ministry of the Environment observation study, and what you actually see depends heavily on cloud cover, moonlight, and the season.