4 Best Portable Equatorial Mounts for Tracking Sharp, Pinpoint Stars
Mount a camera on a tripod and photograph the night sky, and Earth's rotation will slowly drag every star into a short streak. A portable equatorial mount fights that drift, rotating in sync with the sky to keep stars as sharp points of light. Whether you are after a clean wide-angle Milky Way or ready to step beyond fixed-tripod shooting, this guide lays out the selection criteria and practical techniques you need.
We will evaluate four trackers across four axes: payload capacity, weight, focal-length sweet spot, and ease of Polar alignment. The rule of thumb is to load no more than about 70 % of rated capacity, and to expect a noticeable jump in difficulty once you pass 200 mm. With that baseline in place, we compare the Vixen Polarie U, Kenko Skymemo S, Sightron Nano Tracker, and Unitec SWAT-mini, then walk through a five-step first-night workflow and the real-world settings that separate tracked from untracked shooting.
What Is a Portable Equatorial Mount? Understanding the Difference from Fixed-Tripod Shooting
A portable equatorial mount strips a full equatorial mount down to a single tracking axis, eliminating the declination axis to create a compact, lightweight device that follows the sky's apparent motion. The name sounds technical, but the job is straightforward: a small motor slowly cancels Earth's rotation so stars stay put on your sensor. It is one step beyond simply bolting a camera to a tripod, and the payoff shows clearly when you want a smoother Milky Way at lower ISO.
That said, a portable tracker is not a cure-all. Its comfort zone is wide-angle to normal focal lengths for starscapes and wide-field work. As focal length increases, even tiny alignment errors start showing up in your frames. Push past roughly 200 mm and you enter a different game entirely: Polar alignment precision, tripod rigidity, flexure in the gear train, and the declination of your target all begin to matter. The same category of "tracking device" demands a very different level of care.
The Limits of Fixed-Tripod Shooting and the 500 Rule in Practice
With a fixed tripod, stars drift across the sensor for the entire exposure. At wide angles the trails stay short enough to pass, but push the shutter time and those pinpoints become dashes, washing out fine Milky Way detail. A common guideline is the 500 Rule: on a full-frame body, divide 500 by the focal length to estimate the longest usable exposure.
At 24 mm that gives roughly 21 seconds; at 50 mm about 10 seconds; at 90 mm barely 6 seconds. Twenty-one seconds sounds workable, but by 50 mm the margin shrinks fast, and at 90 mm shutter speed becomes the limiting factor. This is exactly why fixed-tripod shooting feels so restrictive once you move past wide angle.
From personal experience, shooting the Milky Way at 24 mm still leaves room to think about composition. Beyond 50 mm, though, the wall is unmistakable: you want more exposure, but the stars start to streak. To capture the faint tonal gradations in the Milky Way you have to raise ISO instead of extending the shutter, and that trade-off is the single biggest limitation of fixed-tripod work.
What Tracking Gains You, and What It Costs
With a portable equatorial mount, the camera follows the stars throughout the exposure, making it much easier to hold pinpoint stars while extending shutter time. Where fixed shooting might push you to ISO 3200, tracking can bring that down to around ISO 800. Dropping two stops of sensitivity changes the noise profile noticeably, and the tonal range in the Milky Way becomes far more manageable in post-processing.
Take a full-frame 24 mm setup where the fixed-tripod ceiling is about 21 seconds. Tracking lets you expose longer at the same brightness while staying at a lower ISO. Dark-sky backgrounds become smoother, and faint nebulosity that was buried in grain starts to emerge. After years of fixed-tripod work, the feeling of tracked frames is that the "something missing" in a single untracked shot simply fills in.
The trade-off is that while stars are being tracked, the foreground drifts by the same amount. Ridgelines, trees, buildings, foreground rocks, none of them stay still in a single frame. Tracking suits a star-priority composition beautifully, but if you want both the ground and the sky frozen, you need a different workflow. In starscape photography, fixed shooting is "ground-referenced" and tracked shooting is "sky-referenced."
💡 Tip
The image-quality boost from tracking does not come from the mount alone. Pair it with a solid tripod, and check for motor operation and play right after setup. Getting these basics right before the first exposure makes a real difference in hit rate.
How the Single-Axis Design Keeps Things Portable
What makes a portable equatorial mount portable is the decision to drop the declination axis entirely, leaving a single-axis drive that is far simpler, smaller, and lighter. The Vixen Polarie U, Sightron New Nano Tracker II, and Unitec SWAT-mini all sit in this category, and every one of them is dramatically more mobile than a full telescope equatorial mount.
The weight advantage kicks in before you even reach the observing site. The Nano Tracker line is often described in user reports as being in the 400 g class, though the manufacturer does not publish an official body weight. It is roughly the heft of a slightly oversized power bank. Add a compact ball head and a lightweight tripod and the whole kit still fits comfortably in a day-trip pack, which means "bringing a star tracker" never has to mean "bringing a huge bag."
Lightness, however, always has a flip side. Mount a long lens or heavy body on a compact tracker and the issue is less about raw weight than about the center of gravity shifting forward, away from the drive axis. The Polarie U, for instance, is rated at 2.5 kg for starscape and wide-field use, but in practice keeping total payload around 70 % of that figure, roughly 1.75 kg, makes for smoother operation. A body at 800 g, a lens at 800 g, and a ball head at 200 g totals 1.8 kg: technically within spec, but with very little headroom. In setups like this, swapping to a lighter head or shifting the center of mass closer to the mount axis helps noticeably.
This personality, compact and easy to carry yet increasingly demanding as focal length grows, is the essence of a portable equatorial mount. Frame it as a tool for taking wide-to-normal Milky Way and starscape shots one clear step better, and the balance of size, performance, and portability looks excellent.
Choosing the Right Tracker: Payload, Weight, Focal Length, and Polar Alignment
Calculating Total Payload (Including the Head)
The first number to check when choosing a portable equatorial mount is not camera body weight. It is total weight including the ball head. Overlook this and you end up with a setup that specs say should work but in practice wobbles, drifts, or slowly sags after you lock in a composition. The math is simple: add up the camera body, lens, ball head, L-bracket, and any adapter plates.
In real-world use, staying at roughly 70 % of rated capacity avoids most problems. The Vixen Polarie U, for example, is listed at 2.5 kg for starscape and wide-field work. Seventy percent of that is about 1.75 kg. A body at 800 g, a lens at 800 g, and a ball head at 200 g already totals 1.8 kg, technically under the limit but without meaningful margin. In configurations like this, switching to a lighter head, shifting the center of mass toward the mount, or trimming accessories makes a practical difference.
Another point worth noting: payload ratings are not standardized across manufacturers. Vixen specifies the Polarie U's 2.5 kg figure at 10 cm from the center of rotation. Comparing numbers side by side without accounting for measurement conditions can be misleading. "Total payload including head" combined with "70 % operating margin" is a more reliable guideline than raw spec-sheet numbers. And a long telephoto that pushes the center of gravity well forward is always harder on the mount than a short lens at the same weight.
Focal-Length Difficulty Tiers and Exposure Thinking
The sweet spot for a portable equatorial mount is wide-angle to normal focal lengths. This is where the Milky Way and starscapes benefit the most, and where your first-night success rate will be highest. Fixed-tripod ceilings of about 21 seconds at 24 mm, 10 seconds at 50 mm, and 6 seconds at 90 mm illustrate how fast the margin evaporates as focal length grows. Tracking opens up longer exposures and lower ISOs: where fixed shooting at 24 mm might need 21 seconds at ISO 3200, tracking lets you aim for around ISO 800 with a longer shutter.
Past 200 mm, though, difficulty jumps not one but roughly two levels. Mount performance alone is no longer the deciding factor; Polar alignment accuracy, tripod stiffness, wind, payload balance, and even the target's declination all affect your keeper rate. The same 200 mm lens on a still, windless night with a rock-solid tripod will deliver very different results from the same lens on a lightweight tripod in a breeze.
From personal experience, wide-angle work tolerates a fair amount of sloppiness. As focal length increases, that margin of error vanishes fast. Stars go slightly oval, one frame in five shows trailing, center looks fine but the corners suffer. Because of this, the practical question at purchase time is not "what focal length is guaranteed to work" but rather whether your typical shooting focal length sits comfortably within the mount's capabilities.
ℹ️ Note
For wide-angle work, lightweight mounts shine. Once you move past about 100 mm, the precision of your Polar alignment and the quality of your tripod start driving your hit rate more than any other factor. Think in terms of per-focal-length difficulty rather than catalog specs.
Polar Alignment Hardware: Sight Holes, Scopes, and Fine-Adjustment Heads
Ease of Polar alignment is the factor beginners most often overlook. The options fall broadly into three tiers: a simple sight-hole or peep sight, a basic alignment scope, and a full polar-alignment scope. A sight hole is light and fast, and pairs well with wide-angle shooting. The Polarie U's peep sight has a roughly 9-degree true field, which means just getting Polaris somewhere inside it already provides a rough alignment. For wide-angle starscapes, that speed is a real asset.
As focal length increases, though, the story changes. At 100 mm and above, a proper polar-alignment scope becomes a clear advantage. A reticle-based scope lets you place Polaris at a specific position rather than simply getting it "somewhere in the field," and the difference in confidence when pushing exposure times is significant. The Kenko Skymemo S ships with a built-in polar-alignment scope with illumination as standard, which is a tangible advantage for anyone thinking beyond wide-angle work. Wide-angle shooters can start comfortably with a simple alignment method; those planning to move into normal or short telephoto territory will find a polar-alignment scope much easier to work with.
For the head assembly, a two-tier stack with a fine-adjustment head below and a ball head above is a practical arrangement. The lower head handles small azimuth and altitude corrections during Polar alignment, while the upper ball head sets the camera composition. Separating these two jobs makes it much easier to center Polaris, and reduces the chance of bumping the polar axis when reframing.
The trade-off is weight: a fine-adjustment head adds mass and raises the center of gravity. If you chose a lightweight mount for portability, stacking accessories can erode that advantage. Whether the extra alignment comfort is worth the weight depends on your focal-length plans, wide-angle-only shooters can often skip it, while normal-to-telephoto users will appreciate it quickly.
Portability vs. Stability: The Unavoidable Trade-Off
Light gear genuinely lowers the barrier to getting out under the stars. The Nano Tracker class at roughly 400 g feels like tossing an extra power bank into your pack. Pair it with a compact ball head and a travel tripod and the total kit stays manageable for a day hike or a trip abroad.
At the same time, lighter means more susceptible to wind and vibration. A portable equatorial mount is tracking the sky, so any wobble translates directly into elongated stars. Making the mount itself light is fine, but if the tripod is equally flimsy, the setup may look good at installation and then fall apart mid-exposure. In my experience, keeping the mount light but pairing it with the sturdiest tripod you can reasonably carry produces the best overall results.
The right balance between portability and stability shifts with the shooting site. A long hike demands a lightweight kit; a roadside pullout in a windy valley rewards a heavier, stiffer tripod even if it means a bigger bag. Spec sheets naturally draw your eye to the mount, but in practice the entire system, tripod included, determines how your images turn out.
On a related note, how clearly the manual explains the Polar alignment procedure matters more than you might think. Mounts like the Vixen Polarie U, whose manual walks through each step in a straightforward way, let you get set up faster on your first night. And while weight and payload belong on your checklist, price is worth checking in the real market: the Polarie U, for instance, shows a listing of 61,380 yen including tax (~$410 USD) on Kakaku.com, though actual street prices fluctuate.
4 Recommended Portable Equatorial Mounts
Comparison Table
Here is a side-by-side look at the four mounts, drawn from publicly available information. Manufacturers vary in how much detail they disclose, so a blank cell is itself a data point rather than a gap to guess at.
| Mount | Price Range | Body Weight | Payload | Focal-Length Sweet Spot | Beginner-Friendly? | Strength | Weakness |
|---|---|---|---|---|---|---|---|
| Vixen Polarie U | Listed at 61,380 yen incl. tax (~$410 USD) on Kakaku.com | -- | 2.5 kg | Wide-angle to entry-level mid-telephoto | Yes | Extensive documentation; multiple Polar alignment options; smartphone link and shutter control | Body price is not trivial, and costs grow once you add a head and tripod |
| Kenko Skymemo S | -- | -- | -- | Wide-angle to normal; can reach toward mid-telephoto under good conditions | Yes | Built-in polar-alignment scope with illumination makes setup intuitive; easy to leverage low-ISO tracking | Some kits are marked "while supplies last / discontinued"; checking exact bundle contents takes a little care |
| Sightron Nano Tracker | Around 22,000 yen (~$150 USD) on Kakaku.com | ~400 g (user-report figure) | -- | Wide-angle to normal | Yes | Palm-sized portability; pairs naturally with travel and hiking | Light build means stability depends heavily on tripod and accessories at longer focal lengths |
| Unitec SWAT-mini | -- | ~500 g (comparison-article figure) | -- | Wide-angle to normal; lightweight setups | Somewhat niche | Compact enough to slip into a trimmed expedition kit | Limited official specs; works best for users comfortable building their own configuration |
On paper, the Polarie U and Skymemo S sit on the full-featured side while the Nano Tracker and SWAT-mini lean lightweight. In practice the picture is more nuanced. For all-around entry balance choose the Polarie U; for Polar alignment precision choose the Skymemo S; for ultralight expeditions consider the Nano Tracker or SWAT-mini. How far each one reaches in focal length depends, as always, on your alignment accuracy, wind conditions, and tripod quality.
⚠️ Warning
Rather than asking "which mount is the best," ask "which one will I actually take out at night?" If you drive to a dark site and set up next to the car, stability wins. If you hike mountain trails or travel light, the value of a 500 g tracker multiplies fast.
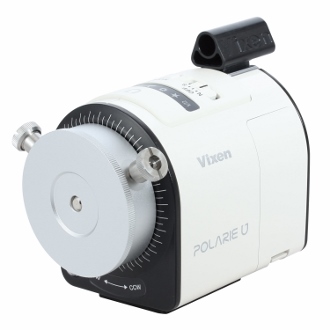
Vixen Polarie U
The Polarie U remains the benchmark for entry-level star trackers. Vixen's official specs list a 2.5 kg payload for starscape and wide-field use, and the current generation is about 20 % lighter than its predecessor, a widely noted improvement. Beyond the weight savings, the Polarie U offers multiple Polar alignment options and a deep pool of community information, which makes planning your first tracked session considerably less daunting.
This mount suits wide-angle to normal shooters who want room to grow toward short telephoto later. You can start with the built-in peep sight for a quick rough alignment, then add accessories for tighter precision as your ambitions expand. "I want to shoot the Milky Way with a landscape first. Later, maybe try a nebula or star cluster." The Polarie U absorbs that kind of ambition gracefully.
Kakaku.com lists the Polarie U at 61,380 yen including tax (~$410 USD), which is a step up from the lightweight class. The payoff is the sheer volume of supporting information. Vixen's manual is structured to be easy to follow step by step, so building a workable setup on your first night is realistic.
In a word, the Polarie U is an entry-balance tracker. A typical 1.8 kg payload, say an 800 g body, 800 g lens, and 200 g ball head, sits within the rated limit on paper but leaves little breathing room in practice. Swapping to a lighter head, shifting the center of mass, or trimming accessories: these small tweaks pay off, and the Polarie U responds well to that kind of fine-tuning.
Vixen ポータブル赤道儀 星空雲台ポラリエU(WT) | ビクセン Vixen
株式会社 ビクセン 「Vixen ポータブル赤道儀 星空雲台ポラリエU(WT)」ページです。天体望遠鏡、双眼鏡、単眼鏡、フィールドスコープ、顕微鏡、ルーペ、コンパスなど、様々な光学機器製品のご紹介と選び方、使い方、楽しみ方などをご提案してい
www.vixen.co.jpKenko Skymemo S
The Skymemo S is the go-to choice for shooters who prioritize tracking stability. Its headline feature is a built-in polar-alignment scope with illumination as standard equipment. This makes Polar alignment a structured, repeatable process rather than guesswork, and the advantage grows once you move past wide angle into normal or short telephoto territory.
Part of the Skymemo S's appeal is how directly it delivers the core benefit of tracking: longer exposures at lower ISO. Scenes that forced high sensitivity under fixed-tripod shooting become far more manageable when the polar axis is dialed in. The resulting drop in noise and improvement in tonal range, especially across the Milky Way, amounts to more than a spec-sheet difference.
One thing to watch, though, is the retail landscape. Kenko's official store lists some Skymemo S kits as discontinued or available only while stock lasts, and it is easy to confuse different bundle configurations that share the same base name. This is not a product-quality issue; it is a purchasing-logistics issue that takes a little research to sort out.
The Skymemo S fits Milky Way shooters who plan to work from normal through short telephoto focal lengths. Having a polar-alignment scope from the start naturally encourages you to refine your alignment technique, which in turn pushes your keeper rate up. The extra effort at setup pays back directly in sharper stars.
スカイメモS | ケンコー・トキナー
人気のスカイメモシリーズに、新しい仲間が加わりました。手のひらに乗るコンパクトなボディながら、充実の機能を多数搭載。ポータブル赤道儀に必須な極軸望遠鏡・明視野照明装置は標準装備。簡単なセッティングで追尾撮影を開始できます。また別売のシャッタ
www.kenko-tokina.co.jpSightron Nano Tracker
Among these four mounts, the Nano Tracker communicates the appeal of ultralight astrophotography most vividly. The current model, the New Nano Tracker II, was announced on November 10, 2023, and Kakaku.com shows listings around 22,000 yen (~$150 USD). User reports consistently describe it as a roughly 400 g unit, and that lightness is its defining trait.
Four hundred grams is hard to appreciate as a number alone. In hand it feels close to a slightly oversized power bank. Add a compact ball head and it is still featherweight; build the rest of the kit around a travel tripod and the whole setup, camera included, fits easily in a backpack. For day-trip astrophotography or shooting stars while traveling, the difference between "I'll bring the tracker" and "I'll leave it behind" often comes down to grams like these.
The Nano Tracker pairs best with wide-angle Milky Way work and any scenario where minimizing pack weight is a priority. Beyond sidereal tracking it offers lunar and solar tracking modes, giving a surprisingly wide creative range for such a small device. In my experience, a lighter kit does not just reduce fatigue on the way to the site; it lowers the psychological barrier to setting up at all. The Nano Tracker sits squarely in that philosophy.
The flip side is the precision you would expect from any ultralight mount. Wide-angle work feels effortless, but push the focal length or pair it with a spindly tripod and the same lightness that made the hike easy can erode your keeper rate. This is not gear you can afford to be sloppy with; it is gear that rewards careful supporting choices precisely because it is so light.
New nano.tracker Ⅱ | 株式会社サイトロンジャパン - 星空追尾装置
www.sightron.co.jpUnitec SWAT-mini
The SWAT-mini appears in comparison articles at around the 500 g mark. Official specs are harder to pin down, but for photographers who enjoy fine-tuning their gear configurations, that is part of the appeal.
What makes it interesting is that sheer compactness can change the way you shoot. A bulky, car-dependent setup invites excuses: "clouds look iffy, the gear is heavy, let's skip tonight." At SWAT-mini levels of portability, you can decide to go out after checking the sky. Astrophotography output correlates as much with how often you actually shoot as with what equipment you own, so this kind of agility is not a minor point.
The SWAT-mini suits travel, expedition, and weight-conscious workflows. If you want a minimal wide-to-normal system that fits into a small bag, it has genuine appeal. On the other hand, if you value abundant documentation and a wide accessories ecosystem from the start, the Polarie U or Skymemo S will feel more welcoming. The SWAT-mini is a mount whose impression splits cleanly on whether the philosophy of "as light and compact as possible" resonates with you.
A strong contender for ultralight expeditions, aimed at photographers who put portability above everything else.
First-Night Workflow: Setup Through Test Shots
Leveling and Orientation Basics
The single most effective thing you can do on your first night is not a clever camera setting; it is not rushing the physical setup. A portable equatorial mount may be small, but it is performing precision tracking against Earth's rotation. If the tripod is tilted, every subsequent adjustment, Polar alignment included, fights an uneven starting point. Begin by spreading the legs firmly and adjusting their length to get the platform level.
From there, tilt the mount's polar axis to match the latitude of your observing site. In the Northern Hemisphere this means angling the axis upward toward north, creating a slanted shaft sitting on a level tripod. When this angle is close, the Polar alignment step that follows becomes much more intuitive. The details, scale markings, knob feel, vary by model, but the concept is the same whether you are using a Polarie U or a Skymemo S.
For direction, a rough northward aim is enough to start. Trying to nail it perfectly at this stage tends to stall the whole process. Use a compass app or a map to find north, point the mount toward Polaris, and move on. When this step is done carefully, the actual Polar alignment becomes a matter of refining rather than searching. I find that resisting the urge to mount the camera at this stage, and instead stabilizing the base first, actually speeds up the entire session.
Polar Alignment: The Core Five Steps
Polar alignment looks intimidating on paper, but locking in a repeatable sequence removes most of the confusion. For your first night, these five steps will get you there.
- Level the tripod
Spread the legs fully, eliminate wobble, and confirm the platform is horizontal. If the base is off, altitude and azimuth fine-adjustments will fight each other.
- Aim the mount roughly north
Point the body northward and tilt the polar axis to your site's latitude. Precision is not the goal yet; you are building a "foundation pointed at Polaris."
- Place Polaris in the sight hole or polar-alignment scope
On a Polarie U, start by getting Polaris into the peep-sight field. On a Skymemo S with its built-in polar-alignment scope, use the reticle to position the star precisely. For wide-angle work, being in the general vicinity already yields usable tracking; at longer focal lengths, the care you put into this step shows directly in your images.
- Set the tracking mode and confirm motor operation
Select sidereal tracking, check that power is stable, and verify the motor is actually running. These mounts are quiet, so a visual or indicator-light check matters. A wrong mode setting will streak stars even with perfect alignment.
- Take a short test exposure and refine
Do not jump straight to a long exposure. Shoot a brief test frame, zoom in on the LCD, and check whether stars are round or trailing. If they trail, note the direction and nudge altitude or azimuth a little. This single frame gives you more information than anything else in the setup process.
ℹ️ Note
Polar alignment improves through iteration, not a single attempt. Set up, align, take a short test, adjust, repeat. At normal focal lengths and above, an alignment that "looks right" to the eye can still leave detectable drift in a photograph.
Test Shots and What to Look For
Start with a short exposure rather than going straight to a long one. The purpose of the first frame is not art; it is verification. Zoom into the image on the camera's rear LCD and you will see things invisible to the naked eye: faint trailing, soft focus, or slight elongation. Check not just the center of the frame but the corners as well.
Two things matter most: star trailing and focus. Trailing reveals Polar alignment error or accidental bumps during reframing. Focus issues show up as bloated stars, often caused by temperature shifts or simply not racking past infinity to the true sharpest point. Autofocusing on a bright star in magnified live view and then locking the ring is more reliable than trusting the infinity mark.
The longer the focal length, the more critical this check becomes. Imperfections that wide-angle hides, a slight oval here, one trailed frame in five there, become glaring at normal and short telephoto lengths. Even with the motor running, a tiny tilt in the setup or a loose ball-head clamp can produce drift. Do not trust a single test frame at longer focal lengths; a second confirmation pass pays for itself in keeper rate.
Pre-Trip Checklist: What to Verify at Home
The worst thing that can happen at a dark site is fumbling with unfamiliar controls in the dark. A portable equatorial mount looks simple, but the assembly sequence, body, head, tripod, power, camera mounting order, all benefit from muscle memory. Running through the full setup once at home, in good light, is worth the time. You will learn which knob adjusts altitude, which adjusts azimuth, and which one, if bumped, shifts the composition.
Before heading out, verify these four items:
- Motor operation
Power on, select sidereal tracking, and confirm the indicator or rotation response.
- Play and slop
Wiggle the mounting interface, ball head, and quick-release plate gently. Any unexpected flex here will show up as drift in your images.
- Balance
With the camera and lens mounted, check that the weight is not heavily biased to one side. On compact mounts, balance directly affects tracking stability.
- Power and clamp security
Check battery level, cable retention, and ball-head holding power. If the composition creeps downward when the camera points upward, you will struggle under a real sky.
In my experience, the gap between someone who rehearsed at home and someone winging it on the first night is enormous. Under the stars, every moment of hesitation costs shooting time. Having already confirmed motor operation, play, balance, power, and clamp strength means you can give your attention to the sky instead of the gear. And when your test shot finally shows stars frozen in place, the thrill hits harder for it.
Settings Guide: Keeping Stars as Points While Shooting the Milky Way
Focal-Length Comparison: Fixed vs. Tracked Settings
When you want the Milky Way with pinpoint stars, the difference between fixed and tracked shooting is not just "longer exposures." The real gain is that extending shutter time lets you lower ISO, and that is where image quality shifts. Fixed shooting hits its exposure ceiling first, forcing you to raise sensitivity to pull the faint Milky Way out of the dark. Tracking follows the sky, so you can gather the same brightness at a quieter setting.
Here is how the feel changes by focal length:
| Focal Length (approx.) | Fixed Exposure Ceiling (approx.) | Fixed Settings (typical) | Tracked Settings (typical) | Notes |
|---|---|---|---|---|
| 20-24 mm | ~21 s | ISO 3200, short exposures | ~ISO 800, longer exposures possible | The classic wide-field Milky Way range |
| 50 mm | ~10 s | ISO 3200, often still underexposed | ~ISO 800 achievable, but alignment accuracy starts to matter | Cropping into part of the Milky Way |
| ~100 mm | ~6 s | Very challenging on a fixed tripod | ISO 800 feasible, but keeper rate drops significantly | Closer to wide-field deep-sky; setup precision is critical |
At 20-24 mm, fixed-tripod shooting still leaves room for creative work. A roughly 21-second ceiling at 24 mm full-frame, combined with a fast lens and higher ISO, can capture the Milky Way's presence. But when you want to cleanly separate dark nebulae or tease out faint gradients, fixed shooting starts to struggle. Tracking at those focal lengths lets you pull ISO down from 3200 to around 800, and the smoothness of the sky background improves by a visible step.
At 50 mm the situation changes sharply. A 10-second ceiling looks short on paper and feels even shorter in practice, because even at a wide aperture the total light gathered is often insufficient. From personal experience, this is the focal length where fixed shooting stops feeling like "it works" and starts feeling like "it's not enough." Switching to tracking opens up the exposure budget dramatically, making it far easier to retain the Milky Way's tonal richness, but alignment care at this focal length feeds directly into results.
Around 100 mm, fixed-tripod constraints become severe. Six seconds is rarely enough to bring out the Milky Way's faint bands in a single frame, and pushing ISO does not restore the headroom. Tracking allows longer, lower-ISO exposures, but at this focal length "being able to track" and "consistently nailing sharp stars" are two different things. Small errors show up immediately, so treating this range as an extension of wide-angle work leads to frustration.
💡 Tip
A scene that required around ISO 3200 on a fixed tripod can often be shot at around ISO 800 with tracking, simply by extending the exposure. When you want to tame grain or bring out the Milky Way's faint bands with more richness, that two-stop difference is where the magic happens.
Low-ISO Tracking in Practice
The most tangible reward of tracked shooting is being able to extend exposure and drop ISO even when stars would have started trailing within seconds on a fixed tripod. On a mount like the Skymemo S with its built-in polar-alignment scope, dialing in a solid alignment lets you shift to settings that would have been impossible untracked.
Consider a scene where fixed shooting at 50 mm begins to show trailing past 8 seconds. You want a longer shutter but cannot have it, so ISO climbs instead. The Milky Way's core is there, but the fainter surrounding glow drowns in noise. Mount the same camera on a Skymemo S, track the sky, and you can hold the shutter open far longer, bringing ISO back down naturally. The image shifts from "pushing hard to see something" to "collecting light patiently."
At 24 mm, a fixed exposure of about 21 seconds at ISO 3200 can, in principle, be replaced by roughly four times the shutter length at ISO 800 when tracked, for equivalent brightness. The subjective change is striking: dark-sky tones gain smoothness, individual stars pop with better separation, and in processing you find far more latitude in the shadows. There is a moment, the first time stars hold perfectly still in a tracked frame, when the silence of the night sky seems to enter the photograph itself.
Tracking is not an unlimited exposure pass, of course. At 20-24 mm there is comfortable margin, but at 50 mm and 100 mm the chain of precision, Polar alignment, tripod stiffness, lens-induced flex, starts to tighten. Tracking is best understood not as a device that makes long exposures "theoretically possible" but as a platform that makes low-ISO shooting practical. Frame it that way and your settings fall into place naturally.
Another approach worth mentioning is shooting the ground fixed and the sky tracked as separate frames. A fixed exposure freezes the foreground; a tracked exposure keeps the stars sharp. Combined, they produce a natural-looking result. You do not need advanced compositing skills; the concept is simply giving each part of the scene the technique it needs.
Limits apply here, too. Beyond 50 mm, slight tracking errors become visible and the fixed foreground exposure may not gather enough light, making it hard to balance the two layers. Around 100 mm, trying to include natural foreground while also perfectly freezing stars is impractical; the composition shifts toward a pure wide-field deep-sky mindset. Wide-angle remains the most comfortable focal range for starscape composites that include the ground, and that constraint is the reason.
The desire to frame the Milky Way large with every star frozen is completely natural, but if you also want the ground tack-sharp, tracking is not a "do everything" button. It is a priority swap. Star sharpness or foreground stillness: once that hierarchy is clear, the settings difference between fixed and tracked shooting reads as photographic intent rather than just numbers.
Common Mistakes and FAQ
Making Polar Alignment Less Intimidating
The biggest reason Polar alignment feels hard is that beginners often try to achieve telephoto-grade precision on their very first attempt, even when shooting wide. Separating your expectations by focal length makes things click immediately. The Polarie U's peep sight has a roughly 9-degree true field. Just getting Polaris inside that window puts you within about 4.5 degrees, and for wide-angle starscapes that is a perfectly usable starting point. Rather than chasing a perfect alignment from the outset, shooting test frames at 20-24 mm and learning to read the results builds skill far faster.
At 50 mm and 100 mm, that approximate approach stops being enough. I have had plenty of nights where an alignment that worked flawlessly at wide angle suddenly showed faint star elongation the moment I switched to a normal lens. This is where a comfortable peep-sight posture and fine-adjustment capability start to matter. Mounts like the Skymemo S, with their built-in polar-alignment scope, make it possible to not just "find" Polaris but "place" it. Once you pass about 100 mm, the benefit of a polar-alignment scope and a fine-adjustment head goes from theoretical to viscerally obvious.
One frequently overlooked pitfall is a hemisphere or mode mismatch. Polaris can be dead center in the field, but if the mount is set to southern-hemisphere mode or a non-sidereal tracking rate, stars will trail despite a solid physical alignment. When you have a good setup but bad results, check the mode selector before re-doing the entire alignment.
ℹ️ Note
At wide angle, "get Polaris into the sight hole" is enough to start. At normal to short telephoto, you need the precision of "placing Polaris at the correct position." Polar alignment is not inherently difficult; the required precision simply scales with focal length.
Troubleshooting Star Trails: A Field Checklist
When stars trail, the mount itself is rarely the first thing to blame. More often the cause is a small breakdown somewhere in the setup chain. Working through a fixed sequence in the field keeps you from chasing ghosts:
- Is the tripod level?
- Is the mount pointed north?
- Did reframing or clamping shift the polar axis after alignment?
- Is the mount set to northern hemisphere and sidereal tracking?
- Are you pushing the exposure time beyond what the current alignment supports?
- Is the focal length too long for the current alignment precision?
- Is the tripod exposed to wind?
- Can you add weight to the tripod's center column or hook to lower the center of gravity?
A common real-world scenario is spending time on Polar alignment while the tripod was never truly level. Even trickier: the alignment was good, but locking the ball head or adjusting a plate during framing nudged the polar axis just enough to show. When I see trailing in a test shot, I start by shortening the exposure. If the stars freeze, the issue is alignment precision or focal length. If they still trail, it is almost certainly a mode or orientation error. That sequence cuts confusion.
Wind deserves special attention. Lightweight mounts are wonderful to carry, but on a breezy night that portability becomes vulnerability. Hanging weight from the tripod's center hook to lower the center of gravity can help, and sometimes simply relocating a few meters to a more sheltered spot changes the keeper rate. When stars trail, the instinct is to suspect the polar axis, but on some nights wind and vibration are the dominant culprits.
Revisiting Payload, Balance, and Tripod Choice
Exceeding the payload limit is a mistake that silently erodes hit rate before you ever press the shutter. The guideline, as discussed, is total weight including head at about 70 % of rated capacity. It is easy to check the mount's spec sheet, feel reassured, and forget to add the ball head and adapter plates. In practice, that oversight pushes you right to the edge.
The Polarie U's official rating is 2.5 kg for starscape and wide-field work. A setup of 800 g body, 800 g lens, and 200 g ball head totals 1.8 kg, within the rating yet not light by 70 % standards. The real question is not "will it hold?" but "will it track cleanly?" A long lens that extends the center of gravity far from the rotation axis acts as a lever, amplifying any imbalance. The result is not just trailed stars but sluggish, imprecise framing.
Flexure and balance problems are similarly insidious. A loose ball head, a short dovetail plate that creates front-heavy bias, a heavy lens with no counterweight: these cause the gear train to creep under load. In images, the symptom is a vague softness or intermittent trailing that is hard to pin down. Swapping to lighter components, downsizing the ball head, or simply shifting the camera's mounting point closer to the rotation axis can stabilize the same mount noticeably.
For tripods, raw weight matters less than rigidity driving your keeper rate. If you face a long hike, the Nano Tracker at roughly 400 g paired with light legs makes total sense; the tracker feels like little more than a slightly heavy power bank in the pack. But at a windy roadside site or with focal lengths past 100 mm, leg diameter and joint stiffness show up directly in the images. Short approaches in exposed locations often reward a heavier, stiffer tripod even though it means a bigger bag.
The Realistic Ceiling for Telephoto on a Portable Tracker
Rather than drawing a hard line at a specific millimeter number, it is more useful to think about where the keeper rate drops off a cliff. On a portable equatorial mount, that cliff tends to appear around 200 mm. At this point the mount's drive accuracy is only one factor among many: Polar alignment precision, tripod stiffness, wind, and front-heavy balance all compound.
Wide-angle to normal focal lengths are solidly practical. Around 100 mm, things remain achievable but the setup needs to be deliberate. This is the boundary where sloppy technique that was invisible at 24 mm starts printing in the stars. A polar-alignment scope and fine-adjustment head become clearly worthwhile here, which is one reason the Skymemo S reaches further into short telephoto territory: its standard polar-alignment scope translates directly into tighter alignment.
Past 200 mm the gap between "it sometimes works" and "it works reliably" widens drastically. A windless night, a beefy tripod, a well-aligned polar axis, and a balanced, lightweight payload can get you there, but it is not the relaxed experience of wide-angle tracking. The urge to frame a nebula or cluster large is entirely natural, and the excitement of a big deep-sky target is hard to resist. Still, a portable equatorial mount's real strength is the freedom to carry the night sky with you. Keep wide-to-normal focal lengths as your high-confidence zone, treat 100 mm-plus as a discipline that rewards careful setup, and you will enjoy the hobby without unnecessary frustration.
Choosing the Right Mount for You
Recommendations by Use Case
If you want a one-line summary: for portability, the Nano Tracker or SWAT-mini; for entry-level balance, the Polarie U; for reaching into short telephoto territory, the Skymemo S. If trimming pack weight is the priority, the palm-sized Nano Tracker or the roughly-500 g SWAT-mini are the natural fit. The lighter the kit, the more nights you actually get out, and shooting frequency is the single biggest driver of improvement.
For a dependable first tracker, the Polarie U is hard to beat. Vixen's official 2.5 kg payload rating for starscape and wide-field work is clearly stated, and the manual is structured for self-guided learning. Kakaku.com lists it at 61,380 yen including tax (~$410 USD), a higher entry cost than the lightweight class, but the depth of available information rounds out the value.
If you plan to work at normal to short telephoto focal lengths, the Skymemo S is where I would point you. The built-in polar-alignment scope translates directly into alignment precision, which is the single biggest factor beyond wide-angle. For those eyeing future growth, the real advice is not to fixate on the mount body alone but to plan around higher-precision alignment hardware and a better tripod from the start.
Your Next-Action Checklist
Narrow the decision with a sequence, not a gut feeling:
- Calculate total payload: camera body + lens + ball head + accessories
- Decide your primary focal-length range
- Filter the four mounts into two based on "portability first" vs. "precision first"
- Check whether you already own a suitable tripod, fine-adjustment head, and ball head
- Read the Polar alignment procedure in the manual before buying
Right before the purchase, verify specs against the manufacturer's official documents, check current street prices, and confirm availability. The Skymemo S in particular warrants a look at which bundles are still in active distribution, so there are no surprises after the order ships.
Related Articles
How to Start Astrophotography: Camera Settings for Smartphones and DSLRs
How to Start Astrophotography: Camera Settings for Smartphones and DSLRs
Star photography might seem daunting at first, but with a fixed tripod setup — whether you're using a smartphone or a mirrorless camera — you can nail your first shot tonight. This practical guide is for beginners who aren't sure what settings to use, walking you through exact values for ISO, shutter speed, aperture, and focal length in the order you'll actually need them in the field.
When Can You See the Milky Way? Prioritizing Location, Moon Phase, and Season
When Can You See the Milky Way? Prioritizing Location, Moon Phase, and Season
If you want to spot that white band stretching across the summer sky, the first thing to check is not the season but how dark a location you can reach. The Milky Way is up there year-round, yet whether you can actually see it comes down to three factors in this order: how dark your site is, how little moonlight there is, and whether the dense core region happens to be above the horizon at that hour.
Is the Achi Village Night Tour Worth It? What Japan's No. 1 Stargazing Claim Really Means and How to Prepare
Is the Achi Village Night Tour Worth It? What Japan's No. 1 Stargazing Claim Really Means and How to Prepare
On a night when conditions align, the sky over Achi Village in Japan is genuinely breathtaking. That said, the 'No. 1 in Japan' label traces back to a 2006 Ministry of the Environment observation study, and what you actually see depends heavily on cloud cover, moonlight, and the season.
5 Composition Patterns for Star Landscape Photography: Balancing Ground and Sky
5 Composition Patterns for Star Landscape Photography: Balancing Ground and Sky
Star landscape photography changes dramatically depending on how you balance the night sky with the foreground in a single frame. Whether you want the Milky Way front and center or you are after the sense of scale that ridgelines and tree silhouettes provide, a vague plan means wasted time at a dark site with no composition to show for it.