How to Watch a Total Lunar Eclipse: Mechanics, Camera Settings, and Upcoming Dates
On the evening of March 3, 2026, a total lunar eclipse will be visible across Japan. Watching the Moon slide into Earth's shadow and transform from an ordinary full Moon into a muted coppery red is one of the most visually immediate experiences in astronomy -- the kind of event you can follow and understand in real time.
This guide is written for first-time lunar eclipse observers and anyone who wants to come away with a decent photo. It covers the underlying mechanics, the timeline for the night, camera exposure guidelines that shift dramatically between the full Moon, partial, and totality phases, and how to check region-specific viewing conditions using the tool provided by the National Astronomical Observatory of Japan (NAOJ). One article, no guesswork.
The naked eye is all you need to enjoy the show, though binoculars or a telescope will sharpen the shadow's edge and bring out color gradations you would otherwise miss. The next total lunar eclipse visible from all of Japan falls on January 1, 2029, so this one is well worth watching -- and recording, even if it is just a single frame.
What Is a Total Lunar Eclipse? Understanding the Red Glow in Three Minutes
A lunar eclipse happens when the Sun, Earth, and Moon line up almost perfectly, and the full Moon passes into Earth's shadow. Picture it from the side: Earth casts a long shadow cone into space, with a dark core surrounded by a lighter fringe. When the Moon moves deep into that dark core, a total lunar eclipse is underway.
It does not happen at every full Moon, though. The Moon's orbital plane is tilted roughly 5 degrees relative to the ecliptic, so most full Moons pass above or below Earth's shadow entirely. Only when the alignment and the Moon's orbital position coincide does an eclipse become visible.
One safety note up front: a lunar eclipse is completely safe to watch with the naked eye. Unlike a solar eclipse, no special filters are needed. You can look directly at the Moon and simply enjoy the changing shape and color.
Umbra and Penumbra: Two Layers of Shadow
The key to understanding a lunar eclipse is that Earth's shadow has two distinct zones. The umbra is the deep inner shadow where almost no direct sunlight reaches. The penumbra is the outer region where sunlight is only partially blocked.
Imagine a long shadow tunnel extending behind Earth, with the umbra at its center and the penumbra wrapped around it. When the Moon first touches the penumbra, its brightness dims slightly. As it crosses into the umbra, the edge begins to darken noticeably, and you can track the shadow creeping across the surface with the naked eye. When the entire Moon sits inside the umbra, you are watching a total lunar eclipse.
You will also encounter the term greatest eclipse -- the moment when the eclipse reaches its deepest point. For a partial eclipse, that is when the Moon is most heavily shadowed. For a total eclipse, it is when the Moon sits deepest inside the umbra. The shadow's edge sweeping across the lunar surface is slow, but following it gives you a tangible sense that Earth really does cast a shadow in space.
Penumbral, Partial, and Total: Three Types of Lunar Eclipse
Lunar eclipses fall into three categories depending on how deeply the Moon enters Earth's shadow. Following the classification used by NAOJ, the differences are straightforward.
| Type | How the Moon enters the shadow | What you see |
|---|---|---|
| Penumbral | Moon passes through the penumbra only | Slight overall dimming, often hard to notice |
| Partial | Part of the Moon enters the umbra | A clear, dark bite out of the Moon's disc |
| Total | The entire Moon enters the umbra | The whole Moon turns coppery red |
A penumbral eclipse is easier to spot in side-by-side photos than with the naked eye -- you might notice a faint dimming and nothing more. A partial eclipse is far more obvious: the shadowed side darkens unmistakably, making the change easy to follow even for beginners. A total eclipse delivers the widest range of visual drama, as the bright full Moon gradually loses its glow and takes on an appearance more like a foreign object in the sky.
Knowing these three types means that the next time a news headline says "lunar eclipse tonight," you can instantly gauge how much of a spectacle to expect. In terms of visual impact, a total lunar eclipse stands well apart from the other two.
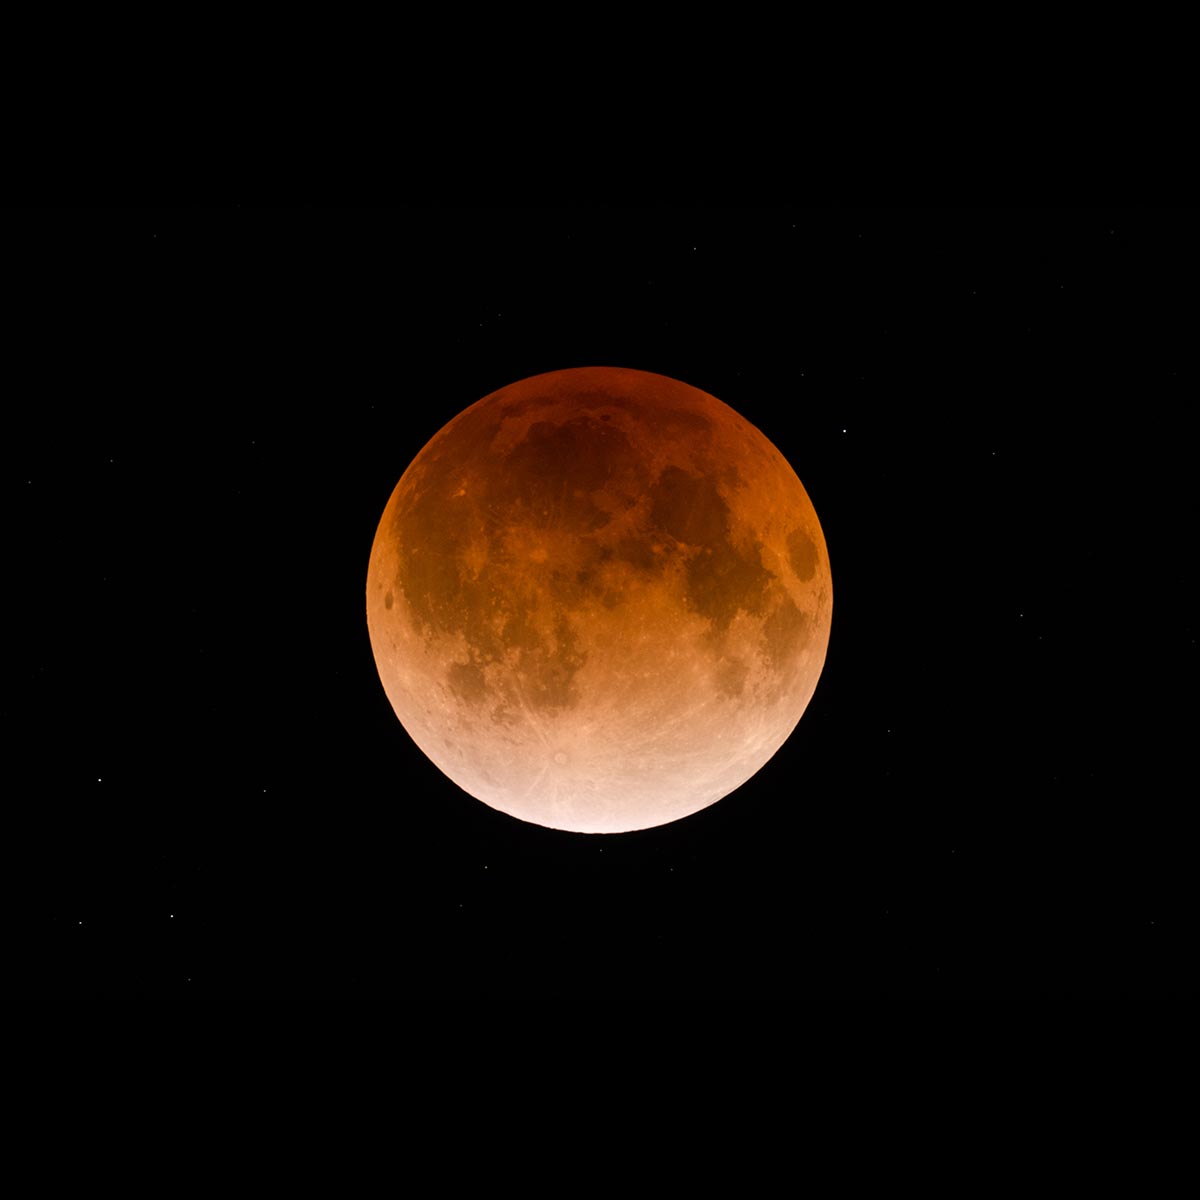
Why the Coppery Red -- and Why It Changes Every Time
The most puzzling thing about a total lunar eclipse is that the Moon does not go black, even though it sits inside Earth's deepest shadow. The coppery-red color appears because sunlight passing through Earth's atmosphere gets bent inward, and it is the red wavelengths -- the ones that survive the long atmospheric path -- that reach the Moon inside the umbra. NAOJ's educational materials explain this mechanism clearly.
Think of it as the same physics behind a red sunset, except it is happening simultaneously around Earth's entire rim. Blue light scatters away easily in the atmosphere; red light passes through more readily and gently illuminates the Moon. What I find fascinating every time I watch totality is that the red is never the same shade twice. Sometimes it leans toward orange; other times it settles into a deep, almost brownish red. The Moon's expression is different at every eclipse.
The main variable is the state of Earth's atmosphere. When stratospheric aerosol levels are high -- after a major volcanic eruption, for instance -- the Moon during totality can appear notably darker and more muted. When the atmosphere is comparatively clear, the red tends to look brighter and more vivid. In other words, the color of a total lunar eclipse is not a fixed quantity; it acts as a mirror reflecting the current condition of Earth's atmosphere. There is beauty in the visual change, and there is a deeper satisfaction in knowing that our own atmosphere is part of the show.
月食とは | 国立天文台(NAOJ)
月食の起こる仕組み、月食の種類、地球の影に対する月の動きや皆既月食中の月の色などについて
www.nao.ac.jpHow to Watch: When and Where to Look
Timeline for the Night of March 3, 2026
The total lunar eclipse of March 3, 2026 unfolds from early evening into the night across Japan. The first thing to note is that the eclipse timeline is essentially the same nationwide. The moment the Moon enters Earth's shadow does not shift significantly between regions, so the broad schedule -- when the shadow first bites, when totality starts -- applies everywhere.
Here are the approximate milestones (all times JST / UTC+9): partial phase begins around 18:50, totality begins around 20:04, greatest eclipse around 20:34, totality ends around 21:03, and the partial phase wraps up around 22:18. These figures follow NAOJ's published timeline; exact seconds vary slightly between sources, so treating them as "around" times is the most practical approach. Totality lasts roughly 58 minutes, which gives you plenty of time to appreciate not only the initial darkening but the full coppery phase as well.
A common point of confusion: the eclipse timeline is shared, but viewing ease is not. Early in the evening the Moon may still be hugging the horizon in some areas while already sitting comfortably above the skyline in others. Relying on the timetable alone can leave you staring at a building where the Moon should be.
During totality the Moon dims enough that stars normally washed out by a bright full Moon begin to emerge. Beyond tracking the shadow's progress, pay attention to how the overall sky brightness changes -- it adds a layer to the experience that many observers overlook. I often notice the shift in sky texture before I notice the Moon darkening further. For a short window, you get a nightscape that a full Moon would normally prevent.
Direction and Altitude: Why an Eastern View Matters
The single most practical concern on the night is which part of the sky to watch. On March 3, the Moon will be in the east to southeast at a low altitude for many locations in Japan during the early stages of the eclipse. The earlier you want to start observing, the more you need an unobstructed eastern horizon. If you want to catch the start of the partial phase around 18:50, prioritize a spot with a clear view to the east.
Shortly after moonrise the Moon is still low, and apartment buildings, houses, power lines, even modest ridgelines can block it surprisingly easily. Watching from a balcony is convenient, but many homes have a clear view to the south and a wall to the east. When observers miss the opening stages of an eclipse, the cause is more often buildings and terrain than clouds.
💡 Tip
If you plan to watch from home, check how much open sky you have toward the east and southeast at the time you expect to start. A quick survey beforehand saves scrambling on the night.
Conditions improve as totality approaches because the Moon climbs higher and clears more obstacles. The earlier you want to start, the more the eastern horizon matters; by totality, the Moon has gained enough altitude to be much easier to observe. Someone who only wants the red phase and someone chasing the first contact will end up choosing slightly different locations.
During totality, the darker Moon lets surrounding stars come through. The sky softens in a way that a normal full-Moon night never allows. Tracking the Moon through binoculars is absorbing, but glancing away every few minutes to take in the whole sky with the naked eye reveals the unique depth that only a total lunar eclipse can create.
Dealing with Regional Differences: How to Check Moonrise and Altitude
Although the eclipse timeline is shared nationwide, moonrise times and the Moon's altitude at any given moment vary by region. Between Hokkaido and Kyushu (the northernmost and southernmost main islands of Japan), or between the Pacific coast and the Sea of Japan coast, the same 18:50 timestamp can mean "already well above the horizon" or "still too low to see clearly." That difference directly affects the experience.
The practical approach is to overlay your local moonrise time, direction, and altitude onto the national timeline. Astronomically, the eclipse is a simultaneous event, but from an observer's standpoint, "where is the Moon in my sky at that moment?" matters just as much. In urban areas, a difference of a few degrees in altitude can be the difference between a clear view and a rooftop in the way.
For region-specific predictions, NAOJ's Lunar Eclipse Local Predictions tool (Gesshoku Kakuchi Yoho) is the most convenient resource. Select your prefecture or city and it returns the eclipse stages along with moonrise time and the Moon's position in your local sky. This data helps when deciding between watching from home, heading to a nearby riverbank, or driving to higher ground.
A lunar eclipse is visible across a wide area simultaneously, but what determines success on any given night is less the national timetable and more the eastern sky conditions from your specific location. If you want to follow the eclipse from first contact, focus on the low-altitude window right after moonrise. If your priority is the red Moon during totality, check the altitude at that time instead. Either way, reading your local sky in advance makes the evening far more predictable.
月食各地予報 - 国立天文台暦計算室
eco.mtk.nao.ac.jpWhat You See with the Naked Eye, Binoculars, and a Telescope
Naked Eye: Start with the Big Picture
A total lunar eclipse is a fully satisfying event for the naked eye alone. As a starting point it is ideal -- call it a Level 1 observation in terms of difficulty. Without any equipment you can track where the shadow enters, watch the bright full Moon gradually dim, and see the whole disc settle into its coppery-red phase during totality.
The strength of naked-eye viewing is that it gives you the sense of scale. During the partial phase, the encroaching dark wedge is unmistakable. Once totality arrives, the Moon does not vanish -- it lingers, faintly colored, and that persistence is what tends to stay with people. During this phase, I find myself watching less for surface detail and more for how the brightness and color shift against the surrounding sky. That is where the character of a lunar eclipse really comes through.
Many of the dramatic total-lunar-eclipse photos you see online involve long exposures or post-processing that pushes the color. In person the hue is typically a quieter reddish-brown, closer to "gently tinted" than "blazing red."
Binoculars: Shadow Edges and Color Variations Come Alive
Once you have taken in the overall progression, binoculars are the natural next step. Standard pairs like 7x50 or 10x50 are easy to handle and work well for eclipse watching. The difficulty bump is small, and the payoff in visual richness is immediate.
Point binoculars at the Moon and the first thing you notice is the texture of the shadow's edge. Rather than a clean line, the boundary has a soft, slightly diffuse quality that gives the scene a three-dimensional feel absent to the naked eye. Look deeper into the darkened area and you may spot uneven coloring -- not a uniform wash of red but patches of lighter and darker tone. This comes from the difference in reflectivity between the lunar maria and highlands; through binoculars, those surface-brightness variations translate into visible color differences.
Handheld binoculars work, but a tripod makes a disproportionate difference with this instrument. A steady image turns faint edge details and subtle color gradients from "maybe I see it" into "definitely there." The Moon is bright enough and changes slowly enough that you do not need to track it aggressively. Lock the binoculars down and let the view come to you -- you will end up gathering more information that way.
Telescope: Tracking the Shadow Across Lunar Terrain
With a small telescope the focus shifts from "the Moon as a whole" to the shadow crossing individual surface features. Watch the dark maria or the rim of a crater, and you can see Earth's umbra advancing across the terrain in slow motion. The same spot changes character over time, and because a total lunar eclipse unfolds over roughly an hour, you can pick a single feature and follow it through the entire transition.
Resist the urge to push magnification too high. Low to medium power that keeps the full disc in the field of view is more useful during an eclipse. You can see how far the shadow has progressed, and you can track which maria and craters darken in sequence. Lunar observation usually invites high power, but on eclipse night, pulling back a little shows more of the drama.
A telescope raises the difficulty a notch, yet the Moon is bright and large enough that it avoids the demanding conditions of deep-sky targets. For beginners, "I set up the scope and couldn't find anything" is not the kind of frustration that arises here. Watching the shadow march across the maria and craters is one of the most tangible things a telescope can show you. A handy way to think about it: the naked eye captures the overview, binoculars add texture, and a telescope lets you follow the progression up close.
Pre-Observation Prep and a Day-Of Checklist
What to Do Before the Night
Observation success depends less on how much gear you bring and more on nailing the location and timing. The top priority is a safe spot with a clear view to the east and southeast. If you want to follow the eclipse from its earliest stages, choose a location where houses, office towers, and treelines do not crowd the low horizon. Riverbanks, open parks, and east-facing hilltops tend to work well (examples in the Tokyo area: the shores of Lake Okutama; in Nagano Prefecture: Shirabiso Highland). Scenic views are no good if the site is private property or off-limits after dark. Because you will be stationary outdoors for an extended period, prioritize solid footing and a reliable route home over the absence of street lights.
Verify the Moon's position ahead of time using a planetarium or star-chart app rather than relying on a rough sense of compass direction. Checking where the Moon will be at the key times is one of the most valuable preparation steps -- it prevents arriving on site only to discover a building or tree you did not account for. Whenever I visit an unfamiliar location, I run through the Moon's position at the relevant times at least once the day before. That single step changes the entire feel of the evening.
Your kit does not need to be extensive, but it should lean toward long stationary sessions. If you are using binoculars, pack the tripod adapter so you can mount them; the improvement in stability is significant. A red-light flashlight, a phone for time notes, a folding chair, warm layers, and a hot drink all pair well with eclipse watching. Set your phone screen to a red-tinted, low-brightness mode to preserve your dark adaptation. Notes can be bare-bones -- just "time + what you see" jotted down briefly is enough.
ℹ️ Note
Cold-weather strategy matters more at the extremities than the torso. Insulate your feet and hands first. Eclipse watching involves little movement, so body heat drains steadily even when you are just standing still. Whether you last through the final phases often comes down to how well you stayed warm.
Day-Of Timeline
On the evening itself, arriving 10 minutes before the start is a comfortable rhythm that avoids last-minute scrambling. The first task on site is not unpacking gear -- it is confirming your compass bearing and relocating the Moon's expected position. Even a spot you scouted may surprise you with a tree branch or light pole intruding on the field of view. A quick adjustment to your standing position at this stage pays dividends for the rest of the night.
If you are using binoculars or a telescope, set focus while the Moon is still bright during the early partial phase. The sharp lunar limb is much easier to lock onto before totality dims the contrast. Binoculars work handheld, but mounting them on a tripod steadies the image and makes shadow-edge details and color gradients noticeably easier to pick out. Having the optics fixed in place means that any time you think "I want a closer look," you just lean in rather than fumbling with adjustments.
Keep your notes brief. My own approach is something like: "~18:50 shadow clearly entering," "~20:04 red tint building," "near maximum -- darker than expected." Decide your note-taking timestamps in advance so you can stay focused on the sky and still have a record to review later. Even without photos, those short entries sharpen the memory considerably.
Weather can shift right up to the last minute, so monitor the local forecast and the NAOJ predictions on the day and stay flexible about relocating. On nights where cloud tracks are readable, a short drive or walk can dramatically improve your line of sight. Staying nimble with your location, rather than committing rigidly to one spot, raises the odds of actually seeing the Moon.
Build warmth and safety into the schedule rather than treating them as afterthoughts. You cool off faster than you expect during a stationary watch, and concentration tends to dip toward the end. A folding chair eliminates the fatigue of standing for hours; a thermos of something warm extends your endurance noticeably. Decide your return route before the observation begins -- you will be walking in the dark, and having the path already settled lets you give the eclipse your full attention.
When an East-Southeast Horizon Is Essential
How much open sky you need depends on which phase you want to see. If you are chasing first contact or the low-altitude drama of the early partial phase, a clear east-to-southeast horizon is critical. The Moon is at its lowest right after rising, and even modest buildings or trees can hide it. A spot you assumed would work from memory may turn out to be surprisingly obstructed.
If you only care about the heart of totality, a partially blocked low horizon is sometimes acceptable. Still, checking the Moon's position before heading out avoids confusion on site. Matching the bearing shown in a star-chart app with the actual layout of roads and buildings turns the abstract question "where should I stand?" into a concrete answer.
The east-southeast requirement bites hardest in residential neighborhoods, districts dense with apartment towers, and valleys with ridgelines to the east. Checking that your sightline extends continuously from east through southeast keeps the Moon in view as it tracks across the sky. If the Moon skims just above a rooftop at your chosen spot, you will spend more time adjusting your position than actually observing. Riverbanks, open fields, and east-facing overlooks -- places with generous sky margins -- reliably outperform tighter settings.
From my experience, a total lunar eclipse rewards an open sky more than expensive gear. Binoculars and cameras are useless if the Moon is hidden behind an obstacle. Conversely, a location with a clean east-southeast sweep delivers the full arc of the event even to the naked eye. When in doubt about where to go, choose by how much of the Moon's path you can see, not by how much equipment you can carry.
Photographing a Total Lunar Eclipse: Smartphone, Telephoto, and Landscape Compositions
Baseline Settings Checklist
Getting a good lunar-eclipse photo depends less on advanced technique and more on not losing the fundamentals. The Moon's brightness changes dramatically between phases, and a camera left on auto exposure will blow out the highlights during the bright stages and lose all tonal detail once totality arrives. The anchor is shooting RAW in manual (M) mode so you control the exposure yourself. RAW preserves the subtle coppery tones and gives you room to lift shadows in post without harsh degradation.
Treat a tripod as non-negotiable. Shutter speeds get progressively slower as totality approaches, and handheld shots lose sharpness fast. On a tripod, turn image stabilization OFF and fire the shutter with a self-timer or cable release. Stabilization systems are designed for handheld use and can introduce micro-vibrations on a locked-down tripod. Once you achieve focus on the Moon, switch to MF and leave it there. Contrast drops during totality, and autofocus tends to hunt.
A note on the exposure values below: they are starting points, not prescriptions. Your lens's maximum aperture, focal length, sensor performance, sky transparency, and the actual brightness during totality all shift the numbers. Always verify exposure and focus on-site with histogram checks and magnified playback, adjusting ISO, shutter speed, and aperture as needed. Skipping that confirmation step is how technically "correct" settings still produce blown highlights, crushed shadows, or motion blur.
Phase-by-Phase Exposure Guidelines
Exposure during a lunar eclipse is the one area where a "set and forget" approach fails quickly. The required exposure swings wildly over a short span. The general flow: fast shutter speeds when the Moon is bright, gradually raising ISO and slowing the shutter as the Moon dims.
As practical reference points: full Moon -- 1/500 s, f/6.3, ISO 1000; partial phase -- 1/160 s, f/6.3, ISO 1000; totality -- 1/2 s, f/6.3, ISO 1000. An alternative approach for the bright stages starts at f/8, ISO 400, 1/640 s, moving to roughly ISO 3200, f/6.3-f/8, 1/10 s during totality. The spread in these numbers reflects the fact that totality brightness genuinely varies from one eclipse to the next.
For quick reference:
|---|---|
| Bright full-Moon stage | 1/500 s, f/6.3, ISO 1000 |
| Partial phase | 1/160 s, f/6.3, ISO 1000 |
| Early partial (alt.) | 1/640 s, f/8, ISO 400 |
| Totality | 1/2 s, f/6.3, ISO 1000 |
| Totality (alt.) | 1/10 s, ISO 3200, f/6.3-f/8 |
One pitfall to watch: exposures longer than about one second make the Moon's drift visible. Earth's rotation moves the Moon steadily across the frame, and the longer the focal length, the more obvious that movement becomes. Pushing the shutter speed too far during totality produces blur from celestial motion, not hand shake. For fixed-tripod telephoto work, raising ISO to stay under one second generally yields sharper results than dragging the exposure.
💡 Tip
If you are unsure about exposure, do not commit to a single frame. Bracket a few shots slightly above and below your best guess. The Moon's appearance shifts so much during an eclipse that the camera's LCD can mislead your judgment.
Smartphone Photography: Settings and Honest Limitations
A smartphone can capture a total lunar eclipse, but the first thing to internalize is that the Moon will look small. Smartphone cameras lean wide-angle, so a Moon that feels dramatic to the naked eye becomes a modest dot in the photo. Frame the exercise as documenting the night rather than producing a close-up, and satisfaction goes up.
If your phone offers manual controls, turn night mode OFF and expose for the Moon. Night mode tries to brighten the dark foreground and tends to blow out the Moon in the process. In a pro or manual mode, lock exposure to favor the Moon. Tap to meter on the Moon, engage AE/AF lock if available, and leave it.
A tripod helps smartphones more than you might expect. Even slight hand movement degrades the image noticeably at these light levels. A tripod plus a Bluetooth remote is a strong combination; a self-timer works if you do not have one. Digital zoom is convenient, but understand that it is essentially cropping in-camera -- do not count on it resolving lunar surface detail.
Limitations are real. During totality the Moon is dim, and smartphone noise reduction and auto-correction tend to flatten the coppery tones and fine surface gradations. A clip-on telephoto attachment helps a little with framing but cannot match a dedicated lens for focus precision or image stability. For the purpose of preserving a memory, though, smartphones are more than adequate. A wide shot that says "the Moon was turning red above this place, on this night" is actually easier to compose on a phone than on a long telephoto rig.
Telephoto Tips for a Big, Sharp Moon
If filling the frame with the Moon is the goal, a telephoto lens is the tool for the job. Composition is straightforward when you are shooting the Moon alone, but sharpness lives in the small mechanical details. Tripod, stabilization off, self-timer or cable release -- these basics are well known, yet at telephoto focal lengths each one directly maps to visible differences in resolution.
Lock focus with AF while the Moon is bright, then switch to MF. As totality approaches, dropping contrast causes even reliable AF to slip slightly, and a small miss turns crater rims soft. Use live-view magnification to fine-tune on the lunar limb or a prominent surface feature. My habit is to nail focus while the Moon is still bright, then recheck just before totality begins.
Exposure is straightforward during the bright phases -- shutter speeds are comfortably fast. The trap comes during totality, when the instinct to slow the shutter can go too far. At telephoto focal lengths, the Moon's drift becomes visible quickly, so prioritize ISO over longer exposures to keep the disc sharp. Even at around 200 mm, a fast shutter pays off: 1/500 s class speeds during the bright phases keep the image tight and eliminate vibration artifacts.
One more habit that pays off: fire several frames at the same framing. Atmospheric turbulence (what astronomers call シーイング) is unavoidable, and a single frame may catch an unlucky moment of poor シーイング. A quick burst of three or four shots at short intervals lets you pick the sharpest result afterward. Lunar-eclipse photography looks like a gear contest from the outside, but in practice these small consistency habits make the real difference.
Balancing Landscape and Moon: Bracketing and HDR
Including foreground scenery alongside a total lunar eclipse gives a photograph a narrative quality that a tight Moon crop cannot match. It is also harder than shooting the Moon alone. The reason is simple: the brightness gap between the Moon and the ground is enormous. Expose for the Moon and the landscape goes black; expose for the landscape and the Moon becomes a featureless bright blob. Trying to get both right in a single telephoto frame that also makes the Moon large is an advanced challenge.
A more practical approach is to use a wide-angle to moderate telephoto, treat the Moon as part of the scene rather than the sole subject, and bracket exposure. The goal shifts from resolving lunar surface detail to showing "a red Moon above a landscape." This composition lets the foreground carry visual weight and pairs naturally with HDR merging.
The workflow is straightforward:
- Frame the composition and lock the camera on a tripod.
- Take a baseline exposure and check the Moon's shape and the landscape's visibility.
- Without moving the camera, shoot additional frames at darker and brighter exposures.
- In post-processing, select the best frames from the bracket and merge via HDR or manual blending.
The advantage of this method is that it safely captures both the bright limb and the dark totality zone. Mid-eclipse, the bright partial-phase edge and the shadowed region coexist in the same frame, making a single ideal exposure almost impossible. Bracketing keeps both ends of the dynamic range on file. When landscape is in the shot, you also get frames that preserve foreground texture alongside frames that protect the Moon's color.
From my own shooting, landscape-plus-Moon images fall apart fastest when you try to make the Moon large and the foreground perfectly exposed in the same frame. A smaller Moon in a beautifully composed scene almost always produces a stronger final image. The most compelling total-lunar-eclipse photographs tend to capture the Moon's quiet color and the stillness of the ground together. Bracketing and HDR turn that difficult balancing act into a repeatable process.
When Is the Next One? How to Look It Up and Never Miss a Date
Next Nationwide Visibility: January 1, 2029
If you want just one date to remember: the next total lunar eclipse visible from all of Japan is January 1, 2029. NAOJ's schedule puts the start of the partial phase at around 0:07 JST (UTC+9). Because this falls in the early hours of New Year's Day, it helps to think of it as a New Year's Eve event that extends past midnight into January 1 -- that framing maps better to how the night actually unfolds.
A common pitfall is remembering only the date and then rushing when the night arrives. Whether you are observing or photographing, what you actually need are the stage-by-stage times: partial start, totality start, greatest eclipse, and end. At the time of writing, detailed times beyond the partial start are best confirmed closer to the event using official sources. Totality start and greatest eclipse are especially important inflection points -- both the visual drama and your exposure decisions hinge on them.
When I am waiting for an astronomical event, I make a habit of remembering not just the date but "which part of the night is the main act." A total lunar eclipse is beautiful even if you simply look up, but having the timeline in your head makes it far easier to catch the Moon's expression as it shifts from one phase to the next.
Using NAOJ's Lunar Eclipse Catalog to Check Annual Schedules
For a longer-range view, NAOJ's Lunar Eclipse Catalog (Gesshoku Ichiran) is the most accessible starting point. It lays out every lunar eclipse year by year, indicating the type -- penumbral, partial, or total -- along with approximate times. Answering "is there one this year?" or "when is the next total?" becomes a quick scan rather than a research project.
Using it is simple. Open the relevant year and look for entries labeled "total lunar eclipse." Check the listed times to see whether the event falls during the evening, late at night, or in the pre-dawn hours. At this stage, precision down to the second is unnecessary; the goal is to judge whether the event fits your waking hours. A weekday eclipse in the small hours, for instance, is worth planning around only if you factor in the next morning as well.
A nice side effect of browsing the catalog is that penumbral and partial eclipses appear alongside totals. Scanning multiple years drives home the point that not every lunar eclipse is a spectacle -- which is exactly why a total eclipse visible nationwide is worth protecting on your calendar. Seeing the rhythm year by year also builds an intuitive feel for how astronomical events are distributed across seasons.
For calendar integration, entering four separate reminders -- partial start, totality start, greatest eclipse, and end -- works better than a single "lunar eclipse" entry. Notifications timed to the sky's changes prompt action more effectively. Add one more entry a week before the event for a location-scouting trip, and you have a two-stage reminder system that catches problems like obstructed sightlines or overpowering street lights before they matter.
ℹ️ Note
Calendar alerts for the eclipse night itself are obvious; the less obvious but equally useful entry is one a week earlier that says "check the southeast sky from your planned spot." That single pre-scout catches most of the avoidable mistakes.
月食一覧表 -つるちゃんのプラネタリウム
turupura.comUsing the Local Eclipse Predictions Tool for Moonrise and Altitude by Region
After nailing down the date, the tool that makes the biggest practical difference is NAOJ's Lunar Eclipse Local Predictions (Gesshoku Kakuchi Yoho). The eclipse timeline is shared across a wide area, but the Moon's altitude at any given moment varies by location. Skipping this step risks showing up on time to find the Moon uncomfortably low in your sky.
The workflow is simple. Select your region, and the tool returns stage-by-stage times along with moonrise time, bearing, and altitude for that location. For visual-only observers, the times may be sufficient. If you are also photographing, altitude data directly affects your results. A low Moon suffers from atmospheric softening and is more likely to be blocked by buildings or terrain. A higher Moon gives cleaner viewing and more compositional freedom.
Three things to check in the output. First, is the Moon even above the horizon at the stage you want to see? Second, is it high enough to clear local obstructions? Third, does the bearing work with the foreground you want to photograph? The interval right after moonrise is where "visible" and "observable" diverge most sharply. Near the horizon, clouds and structures interfere readily, and you may need to wait a few minutes before the Moon rises into a usable position.
Conversely, if the prediction table shows the Moon below the horizon for a given stage in your region, it does not mean the eclipse is not happening -- it means the Moon has not yet risen at your location at that point. The local prediction tool exists precisely to bridge this gap between "event time" and "what my sky actually shows."
Regional differences matter more than you might expect when planning photography. Even though the clock is the same everywhere, the Moon's perceived height differs noticeably between Hokkaido and Kyushu, or between an inland valley and a coastal plain. When I plan a location, I think less in terms of maps and more in terms of "altitude-aware composition." Whether you place a low Moon against a skyline or wait for it to climb into a cleaner zone changes the location you need entirely. Carrying that altitude awareness into the planning stage turns the night's viewing conditions from abstract to concrete.
Frequently Asked Questions
Can I see it with the naked eye?
Yes. A total lunar eclipse is thoroughly enjoyable with nothing more than your own eyes. During the partial phase you can clearly track where the shadow enters and how it spreads. Once totality begins, the bright white glow of the full Moon quietly fades, replaced by a subdued coppery-red tone. The Moon is an inherently bright target, so satisfaction is high even without equipment.
Binoculars, if you have them, add a rewarding layer. What I find especially interesting is that the shadow's edge looks surprisingly crisp while the interior is far from a uniform black -- subtle color variations appear across the surface. Where the naked eye registers a single "red Moon," binoculars reveal patches of lighter and darker tone, making it easier to see which parts of the lunar surface have dimmed and which still hold some brightness.
Is it dangerous?
Not at all. A lunar eclipse is completely safe to watch with the naked eye, unlike a solar eclipse. You are not looking at the Sun, so eclipse glasses or protective filters are unnecessary. Look up at the Moon the same way you would on any ordinary night.
The word "eclipse" is what causes confusion -- the safety considerations are entirely different from those of a solar eclipse. During a lunar eclipse, simply focus on the changing appearance and enjoy the view.
Can I photograph it with a smartphone?
You can -- with one expectation adjustment. The Moon will appear small in a smartphone photo. Smartphones are wide-angle devices by nature, so a Moon that feels impressive to the naked eye becomes a modest bright spot in the frame. Think of it as documenting the night rather than producing a close-up, and the results become satisfying on their own terms.
To improve your hit rate, mount the phone on a tripod, use a self-timer to prevent touch-induced shake, and lock exposure and focus where your phone allows. These steps alone produce noticeably better results than handheld shooting. During totality the Moon dims, and the phone's auto mode may wash out the highlights or over-brighten the sky. Keeping the phone steady and firing multiple frames preserves the color progression well enough. Including the surrounding landscape -- a rooftop, a tree -- turns the shot into a "this is where I watched" record, which is exactly where smartphones shine.
💡 Tip
Smartphone shooting works best when you aim for the atmosphere of the whole sky rather than a tight crop of the Moon. Pairing the Moon with silhouettes of buildings or trees makes the memory of that night vivid.
What is a Blood Moon?
Blood Moon is a popular nickname for the coppery-red appearance the Moon takes on during totality. It is not a formal astronomical term -- think of it as a description of visual impression. The Moon does not go dark because red light, bent through Earth's atmosphere, reaches the umbra and softly illuminates the lunar surface.
The redness is never identical from one eclipse to the next. Some events produce a deep, dark red; others lean toward a brighter orange. Atmospheric conditions shape both the hue and the brightness, so the vivid crimson that "Blood Moon" conjures is not guaranteed. That variability is part of what makes every total lunar eclipse its own event.
What if it's cloudy?
When clouds move in, waiting for gaps is more practical than calling it a night. The Moon is bright enough to show its position through thin cloud, and short clear spells do happen. The phases just before and after totality carry the most dramatic changes, so even a few open minutes leave a strong impression.
If the cloud is too thick, switching to a live stream and following the progression remotely is a perfectly good way to experience the event. Knowing the same phenomenon is playing out under clearer skies somewhere else is one of the appealing aspects of a lunar eclipse. Even when your local sky does not cooperate, the date tends to stick in your memory for next time. As noted earlier, the wait before the next total lunar eclipse visible nationwide in Japan is significant, so a cloudy night actually increases the value of setting that calendar reminder.
Is the timing really the same nationwide?
Essentially, yes. The stages of the eclipse -- start of partial phase, start of totality, greatest eclipse, end of totality -- proceed at virtually the same clock times across a wide area. A lunar eclipse is the Moon entering Earth's shadow; if you can see the Moon, you are watching the same progression simultaneously.
What does differ is moonrise time and the Moon's altitude at any given moment. This is where the "same timing nationwide but different viewing experiences" confusion arises. The event clock is shared, but local sky conditions are not. In one region the Moon may still be low and partially blocked by buildings; in another it has already climbed to a comfortable height.
The distinction is simple: the eclipse timeline is the same everywhere; what changes is where the Moon sits in your local sky at each stage. Keeping those two ideas separate makes the "visible nationwide" claim and the "conditions vary by region" reality fit together neatly.
Wrapping Up: Three Steps You Can Take Right Now
The shortest path to a satisfying observation is settling understanding, location, and settings ahead of time.
- Get the basics into your head: the difference between umbra and penumbra, the fact that the Moon turns coppery red during totality rather than going dark, and the reality that while the eclipse timeline is shared nationwide, viewing ease depends on the Moon's altitude at your location. Once the mechanics click, every change you see in the sky becomes far more interesting.
- Shortlist locations with a clear east-to-southeast horizon, check moonrise and altitude using the NAOJ regional predictions, and factor in the weather forecast to finalize your plan. A lunar eclipse is the kind of event where deciding "where to wait" gets you most of the way to success.
- If you plan to shoot, prepare exposure presets for three brightness levels -- full Moon, partial, and totality -- and have your tripod and release ready. Turn off image stabilization when the camera is tripod-mounted. And for anyone who does not want to miss the next opportunity: January 1, 2029 is the date to put in your calendar now.
Related Articles
Top 20 Stargazing Spots in Japan: A Beginner's Comparison Guide
Top 20 Stargazing Spots in Japan: A Beginner's Comparison Guide
Picking a stargazing spot by reputation alone can lead to disappointment. This guide compares 20 stargazing locations across Japan by sky darkness, accessibility, observation style, and beginner-friendliness — so you can find the one that actually fits your trip.
Meteor Shower Viewing Guide & Annual Calendar: Best Picks for 2026
Meteor Shower Viewing Guide & Annual Calendar: Best Picks for 2026
Planning to see a meteor shower in 2026? You need more than just the dates — the Moon's phase and local peak viewing windows are equally important. This guide covers the major annual meteor showers in one place, compares the three big shows (Quadrantids, Perseids, Geminids) from a beginner's perspective, and makes a clear case for which ones to prioritize this year.
How to Photograph the Night Sky with a Smartphone | iPhone and Pixel Guide
How to Photograph the Night Sky with a Smartphone | iPhone and Pixel Guide
To get the best results photographing stars with your phone, the two things that matter most are keeping it perfectly still and following the right steps for your specific model. For iPhone, Night mode is the foundation — with ProRAW available if you want post-processing flexibility. For Pixel, simply entering Astrophotography mode correctly from Night Sight makes a dramatic difference in success rate.
Perseid Meteor Shower Guide: Direction, Timing, and Viewing Tips for August
Perseid Meteor Shower Guide: Direction, Timing, and Viewing Tips for August
The Perseids are active from around July 17 to August 24, with the peak centered on August 13. In 2025, the predicted peak falls around 5:00 AM JST (UTC+9) on August 13, but bright moonlight will be a significant handicap. In contrast, 2026 sees the peak around 11:00 AM JST on August 13, near new Moon — making it one of the better observing years in recent memory.